Persimmon Carpaccio Salad (Italian Style)

Persimmon Carpaccio Salad (Italian Style)

This post may contain affiliate links, that help support this blog. If you make a purchase through these links, I may earn a commission—at no cost to you. For more information read my disclosure policy.

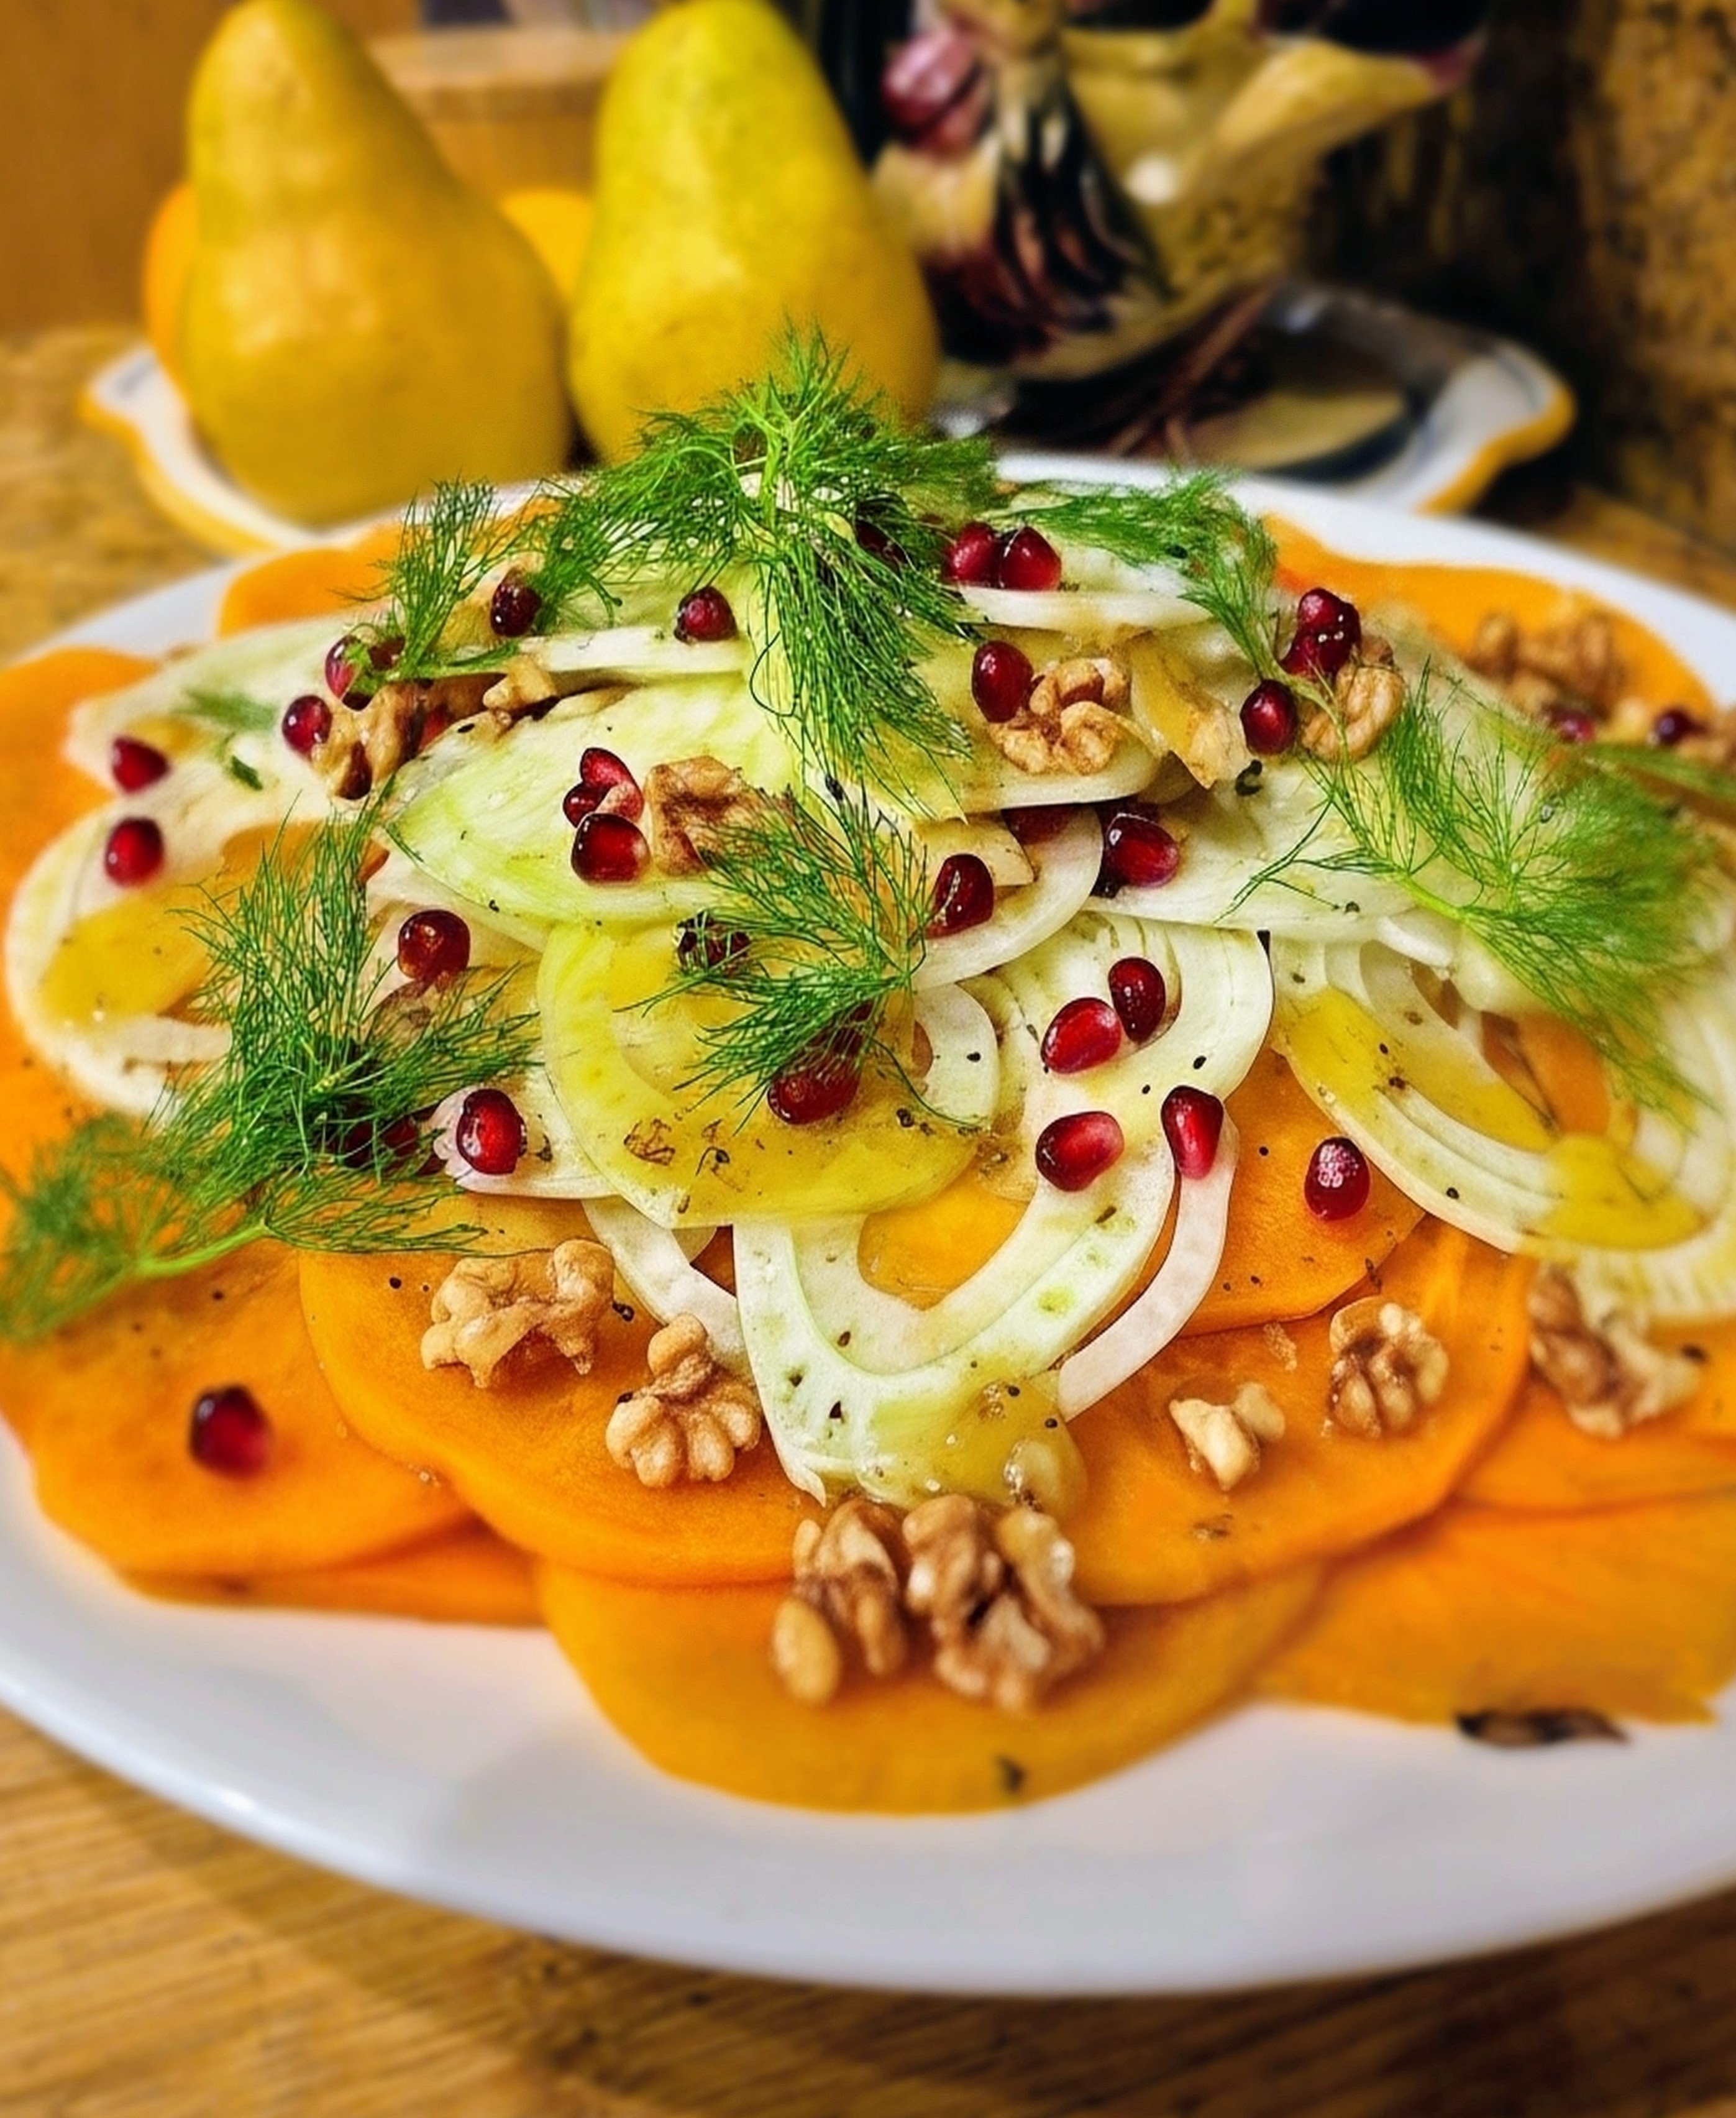
This elegant Persimmon Carpaccio Salad is a simple yet stunning Italian-inspired winter dish. If you love seasonal produce and beautiful plating, this recipe is going to be a favorite. Thinly shaved Fuyu persimmons create a vibrant, sweet base that pairs perfectly with peppery arugula, crisp shaved fennel, toasted walnuts, and salty Parmigiano. It’s light, fresh, and absolutely perfect for holiday gatherings, dinner parties, or as a bright starter to any Italian meal.

In Italy, carpaccio-style dishes are all about showcasing the beauty of the ingredients with minimal dressing—and persimmons shine beautifully prepared this way.

Things to know about this Persimmon Carpaccio Salad (Italian Style)

  • Use Fuyu persimmons, not Hachiya—Fuyus are firm and perfect for shaving paper-thin.

  • mandoline gives the most even slices, but a very sharp knife works too.

  • This dish is best served immediately after dressing so the persimmons stay crisp.


Variations

  • Honey drizzle: Add a touch of honey if you prefer a sweeter profile.

  • With prosciutto: Lay thin prosciutto slices over the persimmons for a sweet–salty bite.

  • Citrus version: Add orange zest or a few citrus segments.

  • Add burrata: For a creamier dish, serve with small pieces of burrata.


Storage

This salad is best enjoyed fresh.
If prepping ahead:


Persimmon Carpaccio Salad (Italian Style)

This Italian Persimmon Carpaccio Salad is a beautiful fall and winter dish that lets sweet, ripe persimmons shine. Thinly sliced persimmons are layered carpaccio-style and finished with peppery arugula, shaved Parmesan, toasted nuts, and a simple lemon vinaigrette. Fresh, elegant, and bursting with seasonal flavor, it's perfect as a light appetizer or alongside roasted meats and holiday meals.

  • 3 ripe Fuyu persimmons, peeled and thinly shaved into rounds
  • 1 cup arugula
  • ½ small fennel bulb, shaved very thin
  • 2 tbsp toasted walnuts, roughly chopped
  • ¼ cup shaved Parmigiano-Reggiano
  • 1 – 2 tbsp extra virgin olive oil
  • 1 tbsp fresh lemon juice or a splash of white balsamic vinegar
  • Sea salt, to taste
  • Fresh cracked black pepper, to taste
  • Fennel fronds, for garnish
  • Optional: a sprinkle of pomegranate arils for color
  1. Lay out the carpaccio

    Arrange the thinly shaved persimmon slices in a beautiful overlapping layer on a large round platter.

  2. Add the vegetables

    Scatter shaved fennel on top. Add a small handful of arugula for freshness and contrast.

  3. Dress the salad

    Drizzle evenly with extra virgin olive oil and fresh lemon juice or white balsamic.

  4. Season

    Sprinkle lightly with sea salt and freshly cracked pepper.

  5. Finish

    Add toasted walnuts, shaved Parmigiano, and fennel fronds. Serve immediately.

Salad
Italian
Italian persimmon salad, persimmon carpaccio, fall salad recipe


Cabbage & Apple Holiday Slaw

Cabbage & Apple Holiday Slaw

This post may contain affiliate links, that help support this blog. If you make a purchase through these links, I may earn a commission—at no cost to you. For more information read my disclosure policy.

I think cabbage is underrated. It’s one of those ingredients we often overlook, yet it brings so much crunch, sweetness, and freshness to a holiday spread. While everyone gravitates toward the heavier, richer dishes this time of year, I always find myself craving something bright that cuts through all that indulgence. That’s where this Cabbage & Apple Holiday Slaw comes in.

It’s crisp, colorful, and so refreshing—shredded cabbage and carrots tossed with thin slices of sweet apple, toasted pecans for warmth, and just enough shaved Parmesan to give it that savory Italian touch. Then everything gets coated in a creamy apple-cider vinaigrette that ties it all together. It’s the kind of side dish that not only balances your table but also surprises people with how simple and delicious it is. I make it every year, and there are never leftovers.

Things to know about this Cabbage & Apple Holiday Slaw

This slaw is incredibly make-ahead friendly, which makes it perfect for busy holiday cooking. You can shred the cabbage and carrots, slice the apples, and even mix the dressing a day in advance—just keep everything separate until you’re ready to serve. The salad stays crisp for hours after dressing thanks to the sturdiness of the cabbage. You can also swap pecans for walnuts, add dried cranberries for a sweeter touch, or use Asiago instead of Parmesan for a sharper flavor. It’s a flexible, crowd-pleasing side dish that fits into any Christmas or holiday menu.

Variations

  • Cranberry Twist: Add dried cranberries or pomegranate seeds for color and sweetness.

  • Walnut & Blue Cheese: Use toasted walnuts and crumbled gorgonzola for a bold flavor.

  • Maple Dijon: Swap honey for maple syrup and add extra Dijon mustard.

  • Creamy Italian: Add Greek yogurt or sour cream to the dressing and include shaved fennel.

  • Apple & Pear: Use a mix of thinly sliced apples and pears.

  • Nut-Free: Replace nuts with pumpkin seeds or sunflower seeds.

  • Savory Version: Skip the honey and apple. Add red onion, extra vinegar, and red pepper flakes.

If you love fresh and festive holiday sides, pair this slaw with:


Cabbage & Apple Holiday Slaw

This Cabbage & Apple Holiday Slaw is a crisp, colorful side dish that's perfect for holiday gatherings and everyday meals alike. Fresh cabbage, sweet apples, and a bright, tangy dressing come together for a refreshing salad with the perfect balance of sweet and savory flavors. It's easy to prepare, can be made ahead, and pairs beautifully with roasted turkey, ham, pork, or grilled meats.

For the slaw

  • 4 cups shredded green cabbage
  • 1 cup shredded carrots
  • 2 large crisp apple, thinly sliced (Honeycrisp or Pink Lady)
  • 1 cup toasted pecans
  • 1 tbsp fresh or dried thyme
  • ½ cup shaved Parmesan (or Asiago)

Creamy Apple-Cider Vinaigrette

  • 1 cup plain Greek yogurt or mayonnaise
  • ⅓ cup olive oil
  • ⅓ cup apple cider vinegar
  • 1 tbsp honey
  • 1 tbsp Dijon mustard
  • 1 small garlic clove, grated
  • Salt and black pepper to taste
  1. In a large mixing bowl, combine the shredded cabbage, shredded carrots, apple slices, toasted pecans, shaved Parmesan, and thyme.

  2. In a separate small bowl, whisk together the mayo, olive oil, apple cider vinegar, honey, Dijon, grated garlic, salt, and pepper until smooth.

  3. Pour the dressing over the slaw and toss gently to evenly coat.

  4. Chill for at least 20 minutes before serving to let the flavors meld.

  5. Garnish with extra pecans and thyme before serving.

Salad
Italian


Milanese-Style Stuffed Chicken Breasts

Milanese-Style Stuffed Chicken Breasts

This post may contain affiliate links, that help support this blog. If you make a purchase through these links, I may earn a commission—at no cost to you. For more information read my disclosure policy.

In Italy, “Milanese-style” simply means breaded and pan-fried — a classic technique from Milan that gives chicken the most beautiful golden crust. Today I’m giving that tradition my own twist by stuffing the chicken with delicate prosciutto and melty provolone before searing it in the pan and finishing it in the oven. It’s elegant enough for company but easy enough for a weeknight, and the garlic Parmesan sauce pulls everything together in the most delicious way.

Things to know about these Milanese-Style Stuffed Chicken Breasts

Make Ahead:
You can assemble the stuffed, breaded chicken breasts up to 24 hours in advance. Keep them covered in the refrigerator, then simply sear and bake when you’re ready to cook. Perfect for entertaining or prepping dinner earlier in the day.

Freezing:
Uncooked stuffed chicken freezes beautifully. Place the assembled, breaded breasts on a baking sheet, freeze until solid, then transfer to a freezer-safe bag for up to 2 months. Thaw overnight in the refrigerator before searing and baking.

Leftovers & Storage:
Store cooked chicken in an airtight container in the refrigerator for up to 3 days. Reheat in a 350°F oven for 10–12 minutes to keep the breading crisp. Avoid microwaving — it softens the coating and can overcook the chicken.

Variations

  • Cheese: Swap provolone for fontina, or mozzarella, for different meltiness.

  • Meat: Use speck instead of prosciutto for a smokier flavor.

  • Herbs: Add fresh basil or parsley inside the chicken for brightness.

  • Breadcrumbs: Try panko for extra crunch or mix in more Parmigiano for a richer crust.

  • Sauces: Serve with marinara, lemon butter, or a simple white wine pan sauce if you want something lighter than the garlic Parmesan sauce.

  • If you enjoy this Milanese-Style Stuffed Chicken, you’ll love some of my other Italian chicken favorites already on the blog. Try my Italian-Style lemon Roast Chicken ( a Complete Meal) my  Stuffed Chicken Breast with mushroom sauce, or my  Italian stuffed meatloaf roll for another elegant, restaurant-quality dinner at home. And if you’re in the mood for cozy comfort, don’t miss my Creamy Sausage Tortellini Soup or Tortellini al Brodo — both reader favorites!


Milanese-Style Stuffed Chicken Breasts

These Milanese-Style Stuffed Chicken Breasts are a delicious twist on the classic Italian chicken cutlet. Tender chicken breasts are filled with a savory combination of Italian cheeses, herbs, and flavorful ingredients, then coated and cooked until golden and crisp on the outside while remaining juicy inside. Inspired by the flavors of Northern Italy, this elegant yet approachable dish brings restaurant-quality Italian cooking to your home table.

For the Chicken

  • 4 boneless, skinless chicken breasts
  • 4 slices prosciutto di Parma
  • 4 slices provolone or fontina cheese
  • 2 large eggs, beaten
  • 1 cup Italian-style breadcrumbs or
  • ½ cup grated Parmigiano-Reggiano with panko mixed
  • 1 tsp dried Italian herbs (oregano, basil, thyme)
  • Salt and pepper, to taste
  • 1 cup olive oil  for frying

For the Garlic Parmesan Sauce

  • 2 tbsp butter
  • 2 cloves garlic, grated
  • 1 cup heavy cream
  • ½ cup freshly grated Parmigiano-Reggiano
  • 1 lemon zest
  • 1 – 2 tbsp lemon juice
  • Salt and pepper to taste

Prep the Chicken

  1. Butterfly each chicken breast by slicing horizontally, almost through, and open like a book.

  2. Pound lightly to even thickness. Season with salt, pepper, and Italian herbs.

Assemble

  1. Place a slice of prosciutto and a slice of cheese inside each chicken breast.

  2. Fold the chicken over to enclose the filling. Secure with toothpicks if needed.

Bread the Chicken

  1. Add the Italian parsley to the egg whisk lightly Dredge each breast in the egg mixture, then coat with breadcrumbs mixed with Parmigiano . Press lightly to adhere.( no flour is necessary )

Sear

  1. Heat olive oil in a large pan over medium heat. Sear chicken 3–4 minutes per side until golden brown.

Bake

  1. Transfer seared chicken to an oven proof dish bake in a reheated 375°F (190°C) oven.

  2. Bake for 10 minutes, until chicken is cooked through (internal temperature 165°F / 74°C) and cheese is melted.

Make the Garlic Parmesan Sauce

  1. In a small saucepan, melt butter over medium heat.

  2. Add garlic and sauté until fragrant (about 30 seconds).

  3. Stir in heavy cream, simmer 2–3 minutes.

  4. Whisk in Parmigiano, lemon zest, and lemon juice.

  5. Season with salt and pepper to taste.

Serve

  1. Plate the baked chicken and drizzle with garlic parmesan sauce.

  2. Optional: serve with roasted vegetables, salad, or potatoes

Main Course
Italian
Italian stuffed chicken breast, chicken Milanese recipe,


Pan-Seared Salmon with Dill Sauce

Pan-Seared Salmon with Dill Sauce

This post may contain affiliate links, that help support this blog. If you make a purchase through these links, I may earn a commission—at no cost to you. For more information read my disclosure policy.

There’s nothing quite like a perfectly seared piece of salmon with a rich, creamy sauce — it’s the kind of dish that used to fly out of the kitchen at our Sonoma County restaurants .  With a busy place, I always loved keeping things simple but flavorful. This pan-seared salmon with a warm dill cream sauce is just that: restaurant-quality flavor made easy at home, ready in under 30 minutes.

Things to know about this Pan-Seared Salmon with Dill Sauce

  • Quick & Easy: From start to finish, this meal comes together in under 30 minutes — perfect for weeknights or a special weekend dinner.

  • Make-Ahead Options: You can prep the dill cream sauce ahead of time and gently reheat it before serving.

  • Pan Choice: A nonstick or stainless steel skillet works best for a crisp, golden sear.

  • Serving Ideas: Pair with steamed asparagus, roasted potatoes, or a light rice pilaf for a complete meal.

  • Storage: Leftover salmon and sauce can be stored separately in the fridge for up to 2 days. Reheat gently on low heat to avoid overcooking.

Variations

  • Herb Twist: Swap dill for tarragon, parsley, or chives for a different fresh flavor.

  • Cream Swap: Use half-and-half for a lighter sauce.

  • Citrus Kick: Add orange or lime juice instead of lemon for a subtle twist.

  • Garlic-Free: Omit the garlic for a milder sauce; caramelized onion alone adds plenty of flavor.

  • Love easy, restaurant-quality dinners at home? Try this creamy dill salmon and check out more salmon favorites on the blog: Salmon Florentine with Mushrooms or Salmon alla Puttanesca for a  bold spicy kick. And my personal favorite quick and easy salmon piccate for a light bright flavor Don’t forget to save this recipe and share it with friends!


Pan-Seared Salmon with Dill Sauce

This Pan-Seared Salmon with Dill Sauce is a simple yet elegant dish that comes together with restaurant-quality results at home. Perfectly seared salmon fillets develop a golden crust while staying tender and flaky inside, then are paired with a creamy, fresh dill sauce brightened with lemon. This easy seafood recipe is perfect for a quick weeknight dinner, special occasion, or a light Mediterranean-inspired meal

For the Salmon

  • 2 salmon fillets (about 6 oz each)
  • 2 tbsp olive oil
  • Salt & black pepper, to taste
  • 1 teaspoon garlic powder
  • 1 lemon wedge (for finishing)

For the Dill Sauce

  • 2 tbsp butter
  • 1 grated garlic clove
  • 2 tbsp grated onion
  • 1 cup heavy cream
  • ½ cup  white wine
  • 1 tbsp Dijon mustard
  • 1 tbsp lemon juice
  • 1 small garlic clove, grated
  • 2 tbsp fresh dill, finely chopped
  • 2 tbsp sour cream or plain Greek yogurt
  • Salt & pepper, to taste

Sear the Salmon

  1. Pat the salmon fillets dry and season both sides with salt, pepper, and garlic powder.

  2. Heat the olive oil  in a skillet over medium-high heat.

  3. Place the salmon skin-side down (if using skin-on) and cook for 4–5 minutes without moving, until the edges turn opaque and the skin is crisp.

  4. Flip and cook another 2–3 minutes, or until cooked to your liking.Transfer the salmon to a plate and set aside.

Make the Creamy Dill Sauce

  1. In the same skillet, lower the heat to medium and add the butter .

  2. Add the grated onion and grated garlic, sautéing until soft and fragrant, about 1–2 minutes.

  3. Add a small splash of lemon juice (optional). Deglaze the pan with the wine waiting until absorbed before continuing with the recipe.

  4. Pour in the heavy cream and bring to a gentle simmer. Let it cook for 2–3 minutes until slightly thickened. Stir in Dijon mustard, then season with salt and pepper.

  5. Remove from heat and stir in the fresh dill and 2 Tbsp. of sour cream or plain Greek yogurt

Serve

  1. Return the salmon to the pan or plate the fillets and spoon the warm dill cream sauce over top and more fresh dill. Serve with lemon slices

Main Course
Mediterranean
pan seared salmon, salmon with dill sauce, easy salmon recipe, lemon dill salmon, Mediterranean salmon recipe,


Creamy Broccoli Cheddar Soup

Creamy Broccoli Cheddar Soup

This post may contain affiliate links, that help support this blog. If you make a purchase through these links, I may earn a commission—at no cost to you. For more information read my disclosure policy.

In our diners — we had two of them over the years — soup was always a big part of the menu. No matter the season, our customers loved starting their meal with something warm and homemade. We made fresh soup every morning, and this creamy broccoli cheddar soup was one of the favorites. The smell of onions, garlic, and melted cheddar filled the kitchen, and before lunchtime, we’d already have regulars asking, “Is the broccoli soup ready yet?” It’s the kind of cozy, comforting bowl that takes me right back to those busy diner days.

Things to know about  Creamy Broccoli Cheddar Soup

This creamy broccoli cheddar soup is not only comforting but also incredibly easy to make — it’s ready in just 30 minutes! You can make it ahead of time and simply reheat it for a quick lunch or dinner. It’s also freezer-friendly, so you can store leftovers for later without losing any of that cheesy, creamy goodness.

For some tasty variations:

  • Add protein: Stir in cooked chicken or crispy bacon for a heartier meal.

  • Make it spicy: Sprinkle in extra red pepper flakes or a dash of cayenne for a little kick.

  • Veggie twist: Swap some of the broccoli with cauliflower or carrots for a slightly different flavor and color.

  • Cheese upgrade: Try mixing in Gruyère or smoked cheddar for a richer, deeper flavor.

This soup is versatile, quick, and perfect for busy weeknights or cozy weekends.

If you love this creamy broccoli cheddar soup, be sure to check out some of our other cozy favorites on the blog: try our creamy potato leek soup or Italian sausage gnocchi soup for more quick and comforting meals. Don’t forget to browse all our soup recipes for even more easy weeknight ideas! Just type in SOUP in the search bar. ENJOY!!!


Creamy Broccoli Cheddar Soup

This Creamy Broccoli Cheddar Soup is a cozy, comforting classic made with tender broccoli, a rich cheese-filled broth, and the perfect balance of savory flavors. Smooth, creamy, and satisfying, this homemade soup is a family favorite for chilly days and makes a delicious lunch or easy dinner served with crusty bread. It’s a restaurant-style soup you can easily recreate at home.

  • 3 tbsp butter (or olive oil)
  • 1 cup grated onion
  • 2 cloves garlic, minced
  • 1 cup shredded carrots
  • 4 cups chopped broccoli florets
  • 2 tbsp all-purpose flour
  • 3 cups chicken or vegetable stock
  • 1 cup heavy cream
  • 2 cups shredded sharp cheddar cheese
  • 1 tsp red pepper flakes (optional, for a little heat)
  • Salt and freshly ground black pepper, to taste
  1. Sauté aromatics

    In a large pot, or Dutch oven melt the butter over medium heat. Add the grated onion and garlic, and cook for 2–3 minutes until fragrant and soft.

  2. Add vegetables

    Stir in the shredded carrots and chopped broccoli. Sauté for 3–4 minutes, just until the broccoli begins to soften.

  3. Make a light roux

    Sprinkle in the flour and stir to coat the vegetables evenly. Cook for about 1 minute to remove the raw flour taste.

  4. Add stock

    Gradually whisk in the chicken or vegetable stock, stirring constantly until smooth. Bring to a gentle simmer and cook for 10–12 minutes, or until the broccoli is tender.

  5. Add cream and cheese

    Lower the heat and stir in the heavy cream, followed by the shredded sharp cheddar. Stir until melted and creamy. Season with salt, pepper, and red pepper flakes.

  6. Serve

    Ladle into bowls and serve hot with extra cheddar on top and crusty bread on the side.

Soup
American


Italian Stuffed Meatloaf Roll (Polpettone Ripieno)

Italian Stuffed Meatloaf Roll (Polpettone Ripieno)

This post may contain affiliate links, that help support this blog. If you make a purchase through these links, I may earn a commission—at no cost to you. For more information read my disclosure policy.

This Italian-style meatloaf is a comforting twist on my family’s classic meatball recipe . The seasoned meat mixture is spread out, layered with Italian ham, provolone cheese, and steamed spinach, then rolled into a beautiful log and roasted until juicy and golden. It’s perfect for Sunday dinner or any night you want something hearty and impressive.

This meatloaf reminds me of the hearty, comforting meals my mother used to make on chilly Sundays. She always seasoned her meat like meatballs, with  garlic, parsley, and grated onion, and I’ve taken that same flavor base and turned it into a beautiful meat roll stuffed with ham, provolone, and spinach. It’s a dish that feels special enough for company but cozy enough for a family dinner — and the best part is slicing it to reveal that gorgeous spiral of filling inside.

Things to know about this Italian Stuffed Meatloaf Roll (Polpettone Ripieno)


Italian Stuffed Meatloaf Roll (Polpettone Ripieno)

Italian Stuffed Meatloaf Roll, known as Polpettone Ripieno, is a classic Italian comfort food that turns a simple meatloaf into an impressive family-style meal. A flavorful mixture of seasoned ground meat is rolled around a savory filling of cheese, cured meats, or vegetables, then baked until tender and golden. Sliced into beautiful spirals, this traditional Italian dish is perfect for Sunday dinners, holidays, and gatherings where you want a comforting meal with restaurant-quality presentation.

For the meat mixture

  • 2 pounds ground beef (or a mix of beef and pork)
  • 2 large eggs
  • 1 cup grated onion (with juices)
  • ½ cup milk
  • 1 cup bread crumbs
  • 3 slices stale bread torn into small pieces
  • ½ cup grated Parmigiano-Reggiano cheese
  • 2 cloves garlic, finely minced
  • 2 tbsp chopped fresh parsley
  • salt and pepper to taste
  • 1 tsp dried oregano
  • 1 tbsp olive oil

For the filling

  • 6 – 8 thin slices Italian ham (prosciutto cotto or mortadella)
  • 6 slices provolone cheese
  • 1½ cups steamed spinach, squeezed dry
  • Olive oil for brushing
  1. Prepare the meat mixture:

    In a large bowl, combine the  milk, eggs, grated onion (and its juices), Parmigiano, bread and breadcrumbs, garlic, parsley, salt, pepper,  and oregano mix well then add in the meat and mix just until well combined.

  2. Form the base:

    Lay a large piece of parchment paper or plastic wrap on a flat surface. Spread the meat mixture evenly into a rectangle about ½ inch thick.

  3. Layer the filling:

    Arrange the slices of ham over the meat, leaving a small border around the edges. Add the provolone on top, then spread the steamed spinach evenly over the cheese.

  4. Roll it up:

    Using the parchment paper to help, roll the meatloaf tightly into a log, sealing the ends as you go. Wrap it in plastic wrap and refrigerate for at least 1 hour (or overnight) to firm up.

  5. Roast:

    Preheat the oven to 375°F (190°C). Place the meatloaf seam-side down on a parchment-lined baking sheet or roasting pan. Brush lightly with olive oil.

  6. Bake:

    Roast uncovered for 50–60 minutes, or until the internal temperature reaches 160°F (71°C). Let it rest 10 minutes before slicing.

  7. Serve:

    Slice into rounds to reveal the beautiful swirl of ham, cheese, and spinach. Serve with roasted or mashed potatoes.

  8. Optional Pan Sauce

    Don’t let those flavorful pan drippings go to waste! After roasting, I like to make a simple Italian-style pan sauce right in the same pan. Whisk a little flour into the drippings to form a roux, then deglaze with white wine and warm broth. A touch of tomato paste adds richness, and finishing with a pat of butter gives it a silky shine. Spoon this savory sauce over the sliced meatloaf for a beautiful, restaurant-style finish.

Main Course
Italian
Italian stuffed meatloaf, polpettone ripieno, Italian meatloaf roll, stuffed meatloaf recipe,


Stuffed Chicken Breasts with Mushroom Gravy

Stuffed Chicken Breasts with Mushroom Gravy

This post may contain affiliate links, that help support this blog. If you make a purchase through these links, I may earn a commission—at no cost to you. For more information read my disclosure policy.

All the flavors of a classic holiday turkey dinner—made easy any night of the week.

There’s something special about the flavors of a holiday meal — the savory stuffing, the juicy roast turkey, and of course, that rich mushroom gravy poured over everything. But who says you have to wait until Thanksgiving to enjoy it all? These Stuffed Chicken Breasts with Mushroom Gravy bring those same cozy, comforting flavors to your dinner table in under an hour.

This recipe takes simple chicken breasts and transforms them into something spectacular. Each breast is butterflied, filled with the same savory sausage and mushroom stuffing recipe I use for my holiday turkey, then rolled up and baked until golden and juicy. To finish, everything is smothered in my rich, velvety mushroom gravy — the perfect finishing touch.

It’s an elegant yet easy dish that feels festive, whether you’re making it for Sunday dinner or just craving something comforting and homemade on a chilly evening. Plus, it’s a great way to enjoy all those nostalgic holiday flavors without cooking an entire turkey!

Things to know about this Stuffed Chicken Breasts with Mushroom Gravy

  • All the holiday flavor—no turkey required: This dish gives you that classic Thanksgiving-style comfort with a fraction of the effort. Perfect when you’re craving something festive without roasting a whole bird.

  • Use your favorite stuffing: Any kind of stuffing works — traditional bread, sausage, or even a vegetable stuffing. Just make sure it’s cooled before you roll the chicken.

  • Pound the chicken evenly: This helps the chicken cook faster and more evenly, while also making it easier to roll and keep together.

  • Searing adds flavor: Browning the chicken before baking gives it beautiful color and seals in the juices.

  • Don’t skip the gravy: The mushroom gravy ties everything together and keeps the chicken moist and rich.

  • Great for entertaining or meal prep: You can assemble the rolls a day ahead, refrigerate them, and bake before serving. They also reheat beautifully for leftovers.

  • Serving ideas: Pair with mashed potatoes, roasted vegetables, or a light salad for a balanced meal that feels special any night of the week.

  • Try This Next!

    If you love the cozy, comforting flavors in these Stuffed Chicken Breasts with Mushroom Gravy, be sure to check out a few of my other favorite recipes that bring the same warmth to your table:

    Whether you’re making this dish for Sunday dinner or a special family meal, don’t forget to leave a comment below and share how it turned out — I love hearing from you! 💛


Stuffed Chicken Breasts with Mushroom Gravy

These Stuffed Chicken Breasts with Mushroom Gravy are a comforting, restaurant-quality dinner that's perfect for both weeknights and special occasions. Juicy chicken breasts are filled with a flavorful cheese and herb stuffing, then pan-seared and finished with a rich, savory mushroom gravy. Every bite is tender, creamy, and packed with classic comfort-food flavors.

For the Chicken

  • 4 boneless, skinless chicken breasts (6–8 ounces each)
  • 2 tablespoons olive oil or butter (for searing)
  • Salt and freshly ground black pepper, to taste
  • 1 teaspoon garlic powder (optional)
  • 1 teaspoon dried thyme or Italian seasoning

For the Stuffing

  • 2 cups prepared holiday stuffing (cooled slightly before using) (Tip: If the stuffing is too moist, spread it on a plate for 5–10 minutes to dry slightly before filling.)

For the Mushroom Gravy

  • 2 cups prepared mushroom gravy, warmed before serving

To Finish

  • Fresh parsley, chopped, for garnish
  • Extra mushroom gravy, for serving on the side
  1. Preheat the oven to 375°F (190°C).

    Lightly grease or line a baking dish with parchment paper.

  2. Prepare the chicken:

    Slice each chicken breast in half horizontally to create 4 thin pieces.

    Place each piece between two sheets of parchment or plastic wrap and gently pound to an even ¼-inch thickness.

  3. Season both sides of the chicken with salt, pepper, garlic powder, and thyme (or Italian seasoning).

  4. Add the stuffing:

    Spoon about ¼ to ⅓ cup of prepared stuffing onto each pounded chicken breast and spread evenly, leaving a small border around the edges.

  5. Roll tightly from the short end, securing each roll with toothpicks if needed.

  6. Sear for flavor:

    Place the rolled chicken breast in an oven proof  baking dish and bake uncovered for 20–25 minutes, or until the chicken is cooked through (internal temperature should reach 165°F / 74°C).

    While the chicken is baking make the mushroom sauce

  7. Finish with mushroom gravy:

    Remove the toothpicks, spoon the warm mushroom gravy over the chicken, and let rest for a few minutes before slicing.

  8. Garnish and serve with extra gravy and a sprinkle of fresh parsley.

  9. Tips

    Pound the chicken evenly so it cooks uniformly and rolls easily.

    Make ahead: Roll and refrigerate the chicken up to 1 day in advance; bake when ready to serve.

    Serving idea: Add mashed potatoes and greens

Main Course
Italian
stuffed chicken breasts, chicken with mushroom gravy, easy stuffed chicken recipe,


The Ultimate Thanksgiving Dinner Guide

The Ultimate Thanksgiving Dinner Guide

This post may contain affiliate links, that help support this blog. If you make a purchase through these links, I may earn a commission—at no cost to you. For more information read my disclosure policy.

We don’t celebrate Thanksgiving in Italy — at least, not in the traditional American sense. But we do celebrate the same spirit behind it: gathering with family, sharing food made from the heart, and being grateful for the simple joys of life. In Italy, that feeling comes alive during big Sunday lunches or holiday feasts — long meals that stretch into the afternoon, filled with laughter, stories, and too many delicious dishes to count.

When I moved to America, I instantly fell in love with Thanksgiving. It reminded me so much of those Italian family gatherings — the warmth, the noise, the joy of being together around a table overflowing with food. Over the years, I’ve blended a little bit of both worlds into my celebration: classic Thanksgiving dishes with touches of Italian flavor and comfort.

Whether you’re hosting for the first time or a seasoned cook looking to freshen up your holiday menu, this guide brings together my favorite recipes from the blog — from a perfectly roasted holiday turkey and cozy Italian-style soup, to flavorful side dishes that make the meal unforgettable. My goal is to help you create a Thanksgiving dinner that feels joyful, comforting, and wonderfully stress-free — the kind that leaves you with time to savor every bite and every moment.

Thanksgiving Planning 101

A stress-free Thanksgiving starts with a little planning. The secret? Do as much as you can ahead of time. I like to make my shopping list a week before and start prepping small things early — chopping herbs, mixing pie dough, or even setting the table the night before.

Here’s a simple plan to follow:

  • 1 Week Before: Finalize your menu and grocery list.

  • 3 Days Before:  If using a frozen turkey, set in the fridge to thaw. Prep vegetables, bake desserts, and make cranberry sauce.

  • 1 Day Before: Brine or season the turkey, assemble casseroles, and set the table.

  • Thanksgiving Day: Roast the turkey, warm the sides, and savor every moment.

    • Tip: Use large sheet pans or trays to organize ingredients for each dish — it keeps your prep area tidy and makes cooking so much smoother.

Defrosting Turkey

How to Defrost a Turkey
If you’re using a frozen turkey, be sure to give yourself plenty of time to thaw it safely in the refrigerator. The rule of thumb is 24 hours of thawing for every 4–5 pounds of turkey. Place the wrapped turkey on a rimmed baking sheet to catch any drips, and let it slowly defrost in the coldest part of your fridge. A large bird can take several days, so plan ahead — starting the thaw early is one of the biggest stress-savers of Thanksgiving week.

The Star of the Show — The Turkey

Every Thanksgiving table begins with the turkey, and my Best Holiday Turkey recipe is one I look forward to making each year. Roasted with garlic, herbs, and plenty of butter, it’s juicy, tender, and full of flavor.

Even though turkey isn’t something we often cooked in Italy, I’ve come to appreciate how it brings everyone together in the same way a big Italian roast might. The aroma fills the kitchen, the golden skin crackles as it roasts, and everyone hovers around waiting for that first slice.

Turkey Roasting Time and Temperature Guide

Oven Temperature:

  • Roast at 325°F (165°C) — the perfect balance for even cooking and a juicy bird.

Cook Time per Pound (Unstuffed Turkey):

  • 15–17 minutes per pound at 325°F

Cook Time per Pound (Stuffed Turkey):

  • 16–18 minutes per pound at 325°F

Example:

    • 12-lb unstuffed turkey → about 3 to 3.5 hours

    • 16-lb unstuffed turkey → about 4 to 4.5 hours

Pro Tips:

  • Let the turkey rest for at least 30 minutes before carving.

  • Always use a meat thermometer (165°F for the breast, 175°F for the thigh).

  • Save the carcass — it makes the most comforting broth for soup the next day.

Hosting Tips & Timeline

A smooth Thanksgiving is all about timing and ambiance. I like to set my table the night before — candles, linensserving pieces all ready — so I can focus on cooking and enjoying the day.

Hosting checklist:

  • Create a serving plan (decide which dish goes in which pan or bowl). serving bowls

  • Warm your plates before serving set in the oven after removing the turkey and turning the oven off.  — it keeps the food hotter longer.

  • Set out appetizers and drinks early so guests can mingle while you finish cooking.

  • Keep a small pot of simmering citrus and herbs on the stove — it fills the house with the most wonderful scent.

Holiday Soup to Start the Meal

Italian Holiday chicken Soup

Before the main feast begins, I love starting with something warm and cozy. My Italian Holiday Chicken Soup is light but flavorful ,

It reminds me of the simple soups my mother used to make in Italy before a big meal — meant to prepare your appetite and warm your heart. The best part? It can be made a day in advance and reheated just before serving, so it’s one less thing to worry about on Thanksgiving Day.GO TO RECIPE

Favorite Thanksgiving Side Dishes

No Thanksgiving table is complete without an array of sides — and in my kitchen, they often take center stage. I like mixing traditional favorites with Italian-inspired twists that bring a little Mediterranean flair to the holiday table.

Try some of these delicious sides from the blog:

Savory sausage mushroom stuffing

hearty, rich, and full of flavor.GO TO RECIPE

Chicken Apple Stuffing

sweet, savory and full of fall flavors.GO TO RECIPE

Easy Savory Mushroom Gravy

the perfect topping for turkey or mashed potatoes.GO TO RECIPE

Balsamic Glazed Brussels Sprouts with Bacon

quick, easy, and irresistible stovetop side dish that comes together in just minutes.GO TO RECIPE

Easy Cranberry Sauce in Minutes

You won’t believe how quick this Easy Cranberry Sauce comes together. It takes just minutes to make, and taste better than store bought.GO TO RECIPE

Parmesan scallop mashed potatoes

There is something about mashed potatoes that just says Thanksgiving. And when you take that classic and add parmesan cheese it’s Italian!!GO TO RECIPE

Sweet Endings — Desserts

After the feast, dessert is where the celebration continues. Whether you’re a pumpkin pie traditionalist or love something a little different, these desserts bring warmth and a touch of sweetness to end the meal.

Favorite desserts from my kitchen:

Italian Crostata Jam Tart

a beautiful twist on the classic pie with a rich, moist crumb delicious and ideal for sharing.GO TO RECIPE

Crescent Amaretti Cookies

crisp on the outside, chewy in the center — a holiday favorite. Serve with espresso or a small glass of dessert wine for the perfect Italian-style finish.GO TO RECIPE

Caffè Affogato with Chocolate Sauce

a delicious dessert coffee drink.GO TO RECIPE

Leftovers Reinvented

If you ask me, the day after Thanksgiving might be even better than the holiday itself. Leftovers turn into comforting meals that carry the celebration into the weekend.

Try these ideas:

Easy Italian Chicken Croquettes

the linked recipe is using chicken use mashed potatoes and bits of leftover turkey instead.GO TO RECIPE

Turkey Cranberry Sandwiches

add leftover cranberry sauce and brie to your favorite artisan bread and grillGO TO RECIPE

✨ Tip: Store leftovers in clear containers so you can easily see what you have. It helps reduce waste and makes meal planning simple.

Thanksgiving might not be an Italian tradition, but its heart — gathering together in gratitude — feels beautifully familiar. It reminds me of home, of family tables overflowing with love, laughter, and food made with care.

Whether your meal is big or small, traditional or a little Italian-inspired, I hope this guide helps you create a holiday that’s full of warmth, flavor, and joyful memories.


Creamy Italian Mac and Cheese Bake

Creamy Italian Mac and Cheese Bake

This post may contain affiliate links, that help support this blog. If you make a purchase through these links, I may earn a commission—at no cost to you. For more information read my disclosure policy.

There’s something so comforting about a bubbling dish of mac and cheese coming out of the oven — golden, creamy, and impossibly cheesy. But in our Italian home, even the most classic dishes tend to take on a Mediterranean twist. This Creamy Italian Mac and Cheese Bake is my way of giving a familiar American favorite a little Italian soul — rich with Fontina, sharp cheddar, mozzarella, and plenty of Parmesan. It’s a dish that feels right at home on any holiday table, especially Thanksgiving.

Growing up, mac and cheese wasn’t something we made often. My mom would serve baked pasta dishes layered with cheese and béchamel, but I didn’t truly fall in love with mac and cheese until years later, when I realized how easily it could be made the Italian way. One Thanksgiving, after too many side dishes that felt the same, I wanted something creamy and comforting that still fit our family’s table — something with the coziness of pasta al forno and the nostalgia of childhood comfort food. This recipe was born that day, and now it’s a staple every year.

The base starts with a simple roux, but instead of plain butter, I melt it with a bit of diced pancetta or prosciutto — just enough to give the sauce a salty, savory depth. The fat renders into the butter, infusing the whole dish with that unmistakable Italian aroma. Then comes the magic: Fontina for smoothness, sharp cheddar for bite, mozzarella for stretch, and Parmesan for that nutty, salty finish.

When it bakes, the top turns crisp and golden while the inside stays luxuriously creamy. It’s comfort food through and through — a little rustic, a little elegant, and completely irresistible. On Thanksgiving, it’s the first dish to disappear from our table, and I can promise it’ll become one of your family’s favorite too!!!

Things to know about this Creamy Italian Mac and Cheese Bake

One of my favorite things about this Creamy Italian Mac and Cheese Bake is how easy it is to customize. I love using Fontina, cheddar, mozzarella, and Parmesan, but Asiago, Provolone, or even a little Gorgonzola are delicious options too.

This recipe is perfect for entertaining because you can assemble it a day ahead and refrigerate it until you’re ready to bake. Just pop it in the oven until it’s hot, bubbly, and golden.

For a vegetarian version, simply leave out the pancetta and add sautéed mushrooms or roasted butternut squash. Whether it’s part of your holiday table or a cozy family dinner, this creamy baked pasta is always a crowd-pleaser.

Craving more comforting Italian classics? Try my Spinach and Mushroom Lasagna with Béchamel SauceRoasted Butternut Squash Gnocchi, or Creamy Italian Sausage Risotto next — each one made to warm your heart and your kitchen.


Italian Mac and Cheese bake

This Italian Mac and Cheese Bake is the ultimate comfort food, combining tender pasta with a rich, creamy blend of Italian cheeses and a golden, bubbly topping. Made with Fontina, mozzarella, cheddar, and Parmesan, every bite is smooth, cheesy, and full of flavor. It's an easy family-friendly casserole that's perfect for weeknight dinners, holidays, or potlucks.

  • 1 Lb. pounds short pasta (cavatappi, shells, or elbow macaroni)
  • 3 Tbsp. tbsp unsalted butter
  • 3 oz. prosciutto or pancetta
  • 3 tbsp. tbsp all-purpose flour
  • 2 cups  whole milk
  • 1 cup  heavy cream
  • 1 cup shredded Fontina cheese
  • 1 cup shredded sharp cheddar cheese
  • 1 cup shredded mozzarella cheese
  • 1/2 cup grated Parmesan cheese, divided
  • 2 cloves garlic minced
  • 1 tsp.  fresh thyme leaves (or ½ tsp dried)
  • pinch of nutmeg (optional)
  • Salt and black pepper, to taste

Crispy topping

  • 1 cup Italian seasoned breadcrumbs
  • 1/2 cup grated parmesan cheese
  • 1 Tbsp. extra virgin olive oil
  1. Cook the pasta:

    Boil in a large stock pot in salted water until just al dente. Drain and set aside.

  2. Cook the pancetta/prosciutto:

    In a large saucepan, melt butter over medium heat. Add diced pancetta or prosciutto and cook until lightly crisp and the fat has rendered, about 3–4 minutes.

  3. Build the roux:

    Stir in the minced garlic and cook 30 seconds. Sprinkle in the flour and whisk for 1 minute, letting it absorb the butter and drippings.

  4. Make the sauce:

    Gradually pour in the milk and cream while whisking constantly until smooth and slightly thickened, about 4–5 minutes.

  5. Add the cheeses:

    Lower the heat and stir in Fontina, cheddar, mozzarella, and ½ cup Parmesan until melted and creamy.

    Season with thyme, nutmeg (if using), salt, and pepper.

  6. Combine:

    Add the cooked pasta to the sauce and stir until well coated.

  7. Prepare the topping:

    Mix breadcrumbs with Parmesan and olive oil.

  8. Bake:

    Pour the pasta mixture into a buttered 9×13-inch baking dish. Sprinkle evenly with the breadcrumb topping.

    Bake at 375°F (190°C) for 40–45 minutes, until bubbly and golden brown.

Main Course
Italian
Italian mac and cheese, baked mac and cheese, creamy macaroni and cheese, Italian cheese pasta bake,


Italian Sausage, Potatoes, and Green Beans

Italian Sausage, Potatoes, and Green Beans

This post may contain affiliate links, that help support this blog. If you make a purchase through these links, I may earn a commission—at no cost to you. For more information read my disclosure policy.

When it comes to simple Italian comfort food, this one-skillet meal checks all the boxes — hearty, rustic, and full of flavor. 🍳✨
Golden potatoes, tender green beans, and savory Italian sausage come together in one pan, simmered with white wine and chicken stock for a delicious, homey dish that tastes like Sunday dinner any night of the week. Best of all, it’s ready in just 30 minutes — perfect for those nights when you want something comforting and satisfying without spending hours in the kitchen.

Things to know about this Italian sausage potatoes and green beans

  • Choose the right sausage:
    Mild or hot Italian sausage both work beautifully — use whichever matches your taste. For extra flavor, try a mix of sweet and spicy.

  • Deglazing adds flavor:
    That splash of white wine lifts all the browned bits from the bottom of the pan, adding rich depth to the sauce. If you prefer, you can skip the wine and just use extra chicken stock instead.

  • Texture tip:
    Cut the potatoes into even bite-sized pieces so they cook evenly. To keep the green beans tender-crisp, add them toward the end of cooking.

  • Make it ahead:
    This dish reheats well — store leftovers in the fridge for up to 3 days. It’s even better the next day as the flavors meld together.

  • Variations
  • Add color:
    Toss in sliced bell peppers or cherry tomatoes for a pop of color and sweetness.

  • Herb twist:
    Swap oregano for rosemary or thyme for a different Italian flavor profile.

  • Spicy version:
    Use hot Italian sausage and add extra crushed red pepper flakes for a little kick.

  • Cheesy finish:
    Stir in a handful of shredded mozzarella or sprinkle grated parmesan over the top right before serving.

  • Vegetable swap:
    Try this recipe with broccoli, zucchini, or even Brussels sprouts instead of green beans — they all cook beautifully in the same skillet.

You May Also Like 🍽️

If you loved this Italian Sausage, Potatoes, and Green Beans skillet dinner, try a few more of my hearty Italian favorites:


Italian Sausage, Potatoes, and Green Beans

Italian Sausage, Potatoes, and Green Beans is a hearty one-pan meal that brings together savory Italian sausage, tender roasted potatoes, and crisp-tender green beans with garlic, herbs, and olive oil. Simple, rustic, and packed with flavor, this family favorite is perfect for busy weeknights while still being satisfying enough for Sunday dinner.

  • 1 Lb. Italian sausage (mild or hot, sliced into rounds)
  • 1½ Lb. yellow potatoes, cut into bite-sized pieces
  • ½ Lb. fresh green beans, trimmed
  • 2 Tbsp. olive oil
  • 1 cup onion, chopped
  • 2 cloves garlic, minced
  • ½ cup dry white wine (for deglazing)
  • 2 cups chicken stock
  • 1 tsp. crushed red pepper flakes (optional)
  • 1 tsp. dried oregano
  • Salt and black pepper, to taste
  • Fresh parsley, chopped (for garnish)
  1. Sauté the aromatics:

    Heat olive oil in a large pan or Dutch oven over medium heat.

    Add the chopped onion and sauté for 2–3 minutes until it begins to soften.

    Stir in the garlic and cook for another minute or two until fragrant.

  2. Add the potatoes:

    Stir in the diced potatoes and cook for about 8–10 minutes, letting them get golden on the edges while stirring occasionally.

  3. Add the sausage:

    Add the sliced Italian sausage directly into the skillet with the potatoes.

    Continue cooking for 8–10 minutes, allowing the sausage to brown and release its flavor into the potatoes.

  4. Deglaze the pan:

    Pour in a splash of white wine, scraping up any browned bits from the bottom of the pan.

    Let it simmer for a minute or two until slightly reduced.

  5. Simmer with stock and green beans:

    Add the chicken stock, green beans, oregano, crushed red pepper flakes, salt, and black pepper.

    Cover and cook for 6–8 minutes, or until the green beans are tender and the potatoes are fully cooked.

  6. Finish and serve:

    Uncover, toss everything together, and cook for another minute or two to let the flavors blend.

    Garnish with fresh parsley and a sprinkle of grated parmesan if desired. Serve warm and enjoy!

Main Course, Side Dish
Italian
Italian sausage and potatoes, sausage green beans recipe, one pan Italian dinner,