Prosciutto-Wrapped Chicken Fingers with Hot Honey

Prosciutto-Wrapped Chicken Fingers with Hot Honey

This post may contain affiliate links, that help support this blog. If you make a purchase through these links, I may earn a commission—at no cost to you. For more information read my disclosure policy.

When it comes to Italian-style appetizers, simple ingredients done right always steal the show. These prosciutto-wrapped chicken fingers with hot honey are the perfect balance of savory, salty, and just a little sweet. Lightly seasoned chicken is wrapped in prosciutto, pan-seared until crisp, then finished in the oven and drizzled with hot honey for an irresistible bite. Elegant enough for New Year’s Eve, yet easy enough to make any time you’re entertaining.

Things to know about this Prosciutto-Wrapped Chicken Fingers with Hot Honey recipe

  • Prosciutto does the work: Its saltiness adds flavor and helps keep the chicken juicy.

  • Pan-sear first: This step crisps the prosciutto and adds depth before finishing in the oven.

  • Drain excess fat: If needed, blot lightly before baking so the prosciutto stays crisp.

  • Hot honey at the end: Drizzle just before serving to keep the coating glossy and fresh.

  • Perfect for parties: Skewers or toothpicks make these easy, mess-free appetizers.

  • If you love easy Italian-inspired appetizers, be sure to explore more crowd-pleasing recipes on the blog. From savory Italian sausage rolls to vegetarian stuffed mushrooms and elegant puff pastry twists, you’ll find simple, flavorful ideas perfect for entertaining, holidays, or casual gatherings any time of year.


Prosciutto-Wrapped Chicken Fingers with Hot Honey

These Prosciutto-Wrapped Chicken Fingers with Hot Honey are a quick and flavorful dinner or appetizer that combines juicy chicken tenders with crispy, salty prosciutto and a sweet-spicy hot honey drizzle. Baked until golden and finished with a touch of fresh herbs, this easy recipe delivers restaurant-quality flavor with minimal effort. Perfect for busy weeknights, game day, or entertaining, it's a crowd-pleasing dish that's both elegant and simple to make.

  • 1 lb boneless, skinless chicken breasts, cut into finger-size strips
  • 3 tbsp olive oil
  • 2 tsp garlic powder
  • 2 tsp Italian seasoning
  • salt and pepper to taste
  • 8 – 10 thin slices prosciutto, cut in half lengthwise if needed
  • 1 – 2 tbsp olive oil or cooking spray
  • 2 – 3 tbsp hot honey, for drizzling
  1. Season the chicken

    Place the chicken strips in a bowl. Season with salt, black pepper, garlic powder, and Italian seasoning.

  2. Wrap with prosciutto

    Wrap each chicken strip tightly with prosciutto. Thread onto skewers if desired.

  3. Pan-fry

    Heat olive oil or  in a large oven proof skillet over medium heat. Cook the chicken, turning, until the prosciutto is lightly crisped, about 5–6 minutes.

  4. Finish in the oven

    Transfer to a pre heated  375°F  until cooked through, 8–10 minutes.

  5. Drizzle & serve

    Drizzle with hot honey just before serving and serve warm.

Appetizer
Italian
prosciutto-wrapped chicken fingers


Italian Sausage Rolls with Puff Pastry (Easy Savory Appetizer)

Italian Sausage Rolls with Puff Pastry (Easy Savory Appetizer)

This post may contain affiliate links, that help support this blog. If you make a purchase through these links, I may earn a commission—at no cost to you. For more information read my disclosure policy.

Golden, flaky, and packed with classic Italian flavor, Italian Sausage Rolls are the kind of appetizer that disappears the moment they hit the table. Think buttery puff pastry wrapped around seasoned Italian sausage, kissed with garlic, herbs, and cheese—simple to make, impressive to serve, and endlessly versatile.

Whether you’re hosting a holiday gathering, planning a New Year’s Eve spread, or just want an easy savory bite with big flavor, these sausage rolls deliver every time.

Things to know about these Italian Sausage Rolls with Puff Pastry (Easy Savory Appetizer)

  • Easy but elegant – store-bought puff pastry does the heavy lifting
  • Classic Italian flavors – fennel, garlic, herbs, and Parmigiano Reggiano
  • Make-ahead friendly – assemble and refrigerate or freeze
  • Perfect for parties – slice small for appetizers or larger for lunch
  • Serving Ideas

    • Serve warm with marinara sauce for dipping
    • Pair with spicy Calabrian chili oil for heat lovers
    • Add to an Italian antipasto platter with olives, cheeses, and roasted peppers

Make-Ahead & Freezing Tips

  • Make ahead: Assemble rolls, cover, and refrigerate up to 24 hours before baking.
  • Freeze unbaked: Slice, freeze solid, then transfer to freezer bags. Bake straight from frozen, adding 5–7 minutes to baking time.

Italian Variations

  • Sausage & Peppers: Add finely chopped sautéed red peppers to the filling
  • Cheesy Mozzarella: Add small cubes of low-moisture mozzarella
  • Spinach & Sausage: Fold in sautéed, well-drained spinach

A Little Italian Inspiration

  • Sausage wrapped in dough has long been part of Italian home cooking—from rustic breads stuffed with salsiccia to bakery-style savory pastries. These sausage rolls are a modern, party-friendly nod to those traditions, using puff pastry for ease without sacrificing flavor.
  • If you loved these Italian Sausage Rolls, be sure to try my other favorite Italian appetizers like Easy Savory Puff Pastry Twists, [Italian Stuffed Mushrooms, and Shrimp Oreganata—all simple, classic recipes that are perfect for entertaining. Don’t forget to bookmark this recipe and follow along for more Italian comfort food made easy.


Italian Sausage Rolls with Puff Pastry (Easy Savory Appetizer)

These Italian Sausage Rolls with Puff Pastry are a simple yet irresistible appetizer made with flaky, buttery puff pastry wrapped around seasoned Italian sausage and baked until golden brown. Crispy on the outside and juicy on the inside, they're perfect for holiday parties, game day, brunch, or as a delicious snack. Serve them with marinara, spicy mustard, or your favorite dipping sauce for an easy crowd-pleasing appetizer everyone will love.

  • 1 pound Italian sausage (sweet or hot), casings removed
  • 2 sheets puff pastry, thawed
  • ½ cup grated Parmigiano Reggiano
  • 1 tbsp Dijon or spicy brown mustard
  • 1 clove garlic, finely minced
  • 1 tbsp chopped fresh parsley
  • ½ tsp fennel seeds, lightly crushed (optional)
  • Freshly ground black pepper, to taste
  • 1 egg, beaten (for egg wash)
  • Sesame seeds or flaky salt (optional, for topping)
  1. Prepare the Filling

    In a bowl, combine the Italian sausage, Parmigiano Reggiano, mustard, garlic, parsley, fennel seeds, and black pepper. Mix gently until just combined—don’t overwork the sausage.

  2. Roll Out the Pastry

    On a lightly floured surface, roll each sheet of puff pastry slightly to smooth seams and create an even rectangle. Cut each sheet lengthwise into two long strips.

  3. Fill and Roll

    Spoon a line of sausage filling down the center of each strip. Brush one long edge with egg wash, then roll the pastry over the filling, seam-side down.

  4. Chill for Clean Cuts

    Place the rolls on a parchment-lined baking sheet and refrigerate for 20–30 minutes. This helps the pastry firm up and makes slicing easier.

  5. Slice and Bake

    Cut each roll into 1½–2-inch pieces. Brush tops with egg wash and sprinkle with sesame seeds or flaky salt if desired. Bake at 400°F (200°C) for 22–25 minutes, or until puffed and deeply golden.

Appetizer
Italian
puff pastry Italian sausage rolls


Crispy Italian Fried Baccala

Crispy Italian Fried Baccala

This post may contain affiliate links, that help support this blog. If you make a purchase through these links, I may earn a commission—at no cost to you. For more information read my disclosure policy.

Fried baccalà has always meant tradition in our home. It’s one of those dishes that instantly brings me back to the kitchen during the holidays, where the smell of hot oil and salt-cured cod filled the air and everyone hovered nearby, waiting for the first crisp piece to come out of the pan. This wasn’t fancy food—it was humble, honest cooking, passed down through generations and made with care and patience.

Baccalà itself has a long history in Italian cooking. Long before refrigeration, salt-curing cod made it possible to preserve fish for months, making it accessible even in inland regions of Italy. Over time, it became a staple for special occasions and meatless days, especially Christmas Eve. Each region has its own way of preparing it, but fried baccalà—lightly battered and golden—remains one of the simplest and most beloved preparations. With just flour and cold water, the batter stays delicate, allowing the fish to shine, exactly the way it was always meant to be enjoyed.

Things to know about this crispy Italian fried baccala

  • Soaking time matters: Properly desalted baccalà should taste mild, not salty. Start tasting after 24 hours and continue soaking if needed.

  • Keep the batter cold: Using ice-cold water creates a lighter, crisper coating when it hits the hot oil.

  • Don’t overcrowd the pan: Fry in batches so the oil temperature stays steady and the baccalà fries evenly.

  • Serve immediately: Fried baccalà is best enjoyed hot and crisp, straight from the pan.

  • If you love traditional Italian seafood dishes, don’t miss my Baccala with Potatoes recipe or the best Italian- style fried calamari another classic that’s always on our table for Christmas Eve. Serve them together for a truly authentic Italian meal, and be sure to explore the blog for more time-honored Italian recipes passed down through generations.


Crispy Italian Fried Baccala

Crispy Italian Fried Baccalà is a traditional dish made with salt cod that’s been soaked, flaked or cut into pieces, lightly battered, and fried until golden and crisp. Popular throughout Italy—especially during Christmas Eve (La Vigilia)—this classic seafood recipe is simple, rustic, and full of flavor. The salty richness of the cod is balanced by a light, airy coating, making it perfect served with lemon wedges, aioli, or a simple marinara sauce.

  • 1½ pounds  salt-cured baccala (cod), soaked and desalted
  • 1¼ cups all-purpose flour
  • 1 – 1¼ cups ice-cold water
  • ½ tsp salt
  • ¼ tsp black pepper (optional)
  • 3 cups Vegetable oil or light olive oil, for frying
  • Lemon wedges, for serving
  • 2 Tbsp. Chopped fresh parsley (optional for garnish)
  1. Soak the Baccalà

    Rinse the salt-cured baccala under cold running water. Place it in a large bowl, cover completely with cold water, and refrigerate for 24–48 hours, changing the water 2–3 times daily.Taste a small piece to ensure it’s properly desalted.

  2. Prepare the Fish

    Drain the baccala well and pat it very dry with paper towels. Cut into 2–3 inch pieces of similar thickness for even cooking.

  3. Make the Batter

    In a bowl, whisk together the flour, salt, and pepper if using. Gradually add the ice-cold water, whisking just until a smooth, pourable batter forms.The consistency should be similar to a light pancake batter—thin enough to drip, but thick enough to coat the fish.

  4. Heat the Oil

    Heat about 1 inch of oil in a wide, heavy skillet over medium-high heat until it reaches 350°F.(If you don’t have a thermometer, a drop of batter should sizzle and float immediately.)

  5. Batter the Baccalà

    Dip each piece of fish into the batter, letting excess drip off, then carefully place into the hot oil. Fry in batches—do not overcrowd the pan.

  6. Fry Until Golden

    Fry for 3–4 minutes per side, turning once, until the baccalà is crisp, golden, and puffed. The interior should be tender and flaky.

    Second

    And so on

Main Course
Italian
crispy Italian fried baccalà fried salt cod recipe


The Best Italian-Style Fried Calamari

The best Italian style fried calamari

This post may contain affiliate links, that help support this blog. If you make a purchase through these links, I may earn a commission—at no cost to you. For more information read my disclosure policy.

Growing up, fried calamari was a true family affair. My mama always bought whole squid and cleaned every single one by hand — separating the tentacles, pulling out the quill, and rinsing everything until it was spotless. I can still see her at the sink, humming while she worked, making sure each ring would fry up perfectly tender.

These days, we’re lucky. Most grocery stores and fish markets sell calamari already cleaned — tubes and tentacles prepped and ready to slice. And while nothing beats the love and tradition of doing it the old-school way, I’ll be the first to admit that buying it cleaned makes this recipe come together in minutes instead of an hour.

Fried calamari has also always been a cherished part of our Feast of the Seven Fishes celebration — that beloved Italian Christmas Eve tradition where the table overflows with seafood. Whether you make this dish once a year for the feast or all year long for your family, this recipe brings that same crisp, golden bite we all grew up loving.

Whether you’re using ready-to-cook calamari or honoring the way our mamas did it, this classic Italian fried calamari delivers that same crisp, golden bite we all grew up loving.

Things to know about this  Best Italian-Style Fried Calamari

  • Dry calamari = crisp calamari.
    Pat the rings and tentacles really well with paper towels. Any moisture will make the coating soggy and cause the oil to splatter.

  • The flour mix matters.
    A 50/50 blend of all-purpose flour and semolina gives that classic Italian trattoria crunch. Semolina helps the coating stay light instead of heavy or bready.

  • Keep the oil hot.
    The magic temperature is 350–365°F. If the oil drops too low, the calamari absorbs oil and turns greasy. Fry in small batches to keep the heat consistent.

  • Fast frying keeps it tender.
    Calamari only needs 1½–2 minutes in the oil. Any longer and it becomes chewy. Pull it out the moment it turns light golden.

  • Season immediately.
    Sprinkle with a little salt right after frying — it sticks better while the calamari is still hot.

  • Serve right away.
    Fried calamari is best eaten fresh from the fryer. It doesn’t stay crisp long, so have your lemon wedges and marinara ready before you start cooking.

  • If you love this crispy Italian fried calamari, don’t miss my other seafood favorites!


The best Italian style Fried Calamari

This crispy fried calamari recipe delivers tender squid with a light, golden coating that's perfectly seasoned and irresistibly crunchy. Served with fresh lemon wedges and marinara sauce, it's an easy Italian seafood appetizer that's perfect for entertaining, holidays, or a restaurant-quality meal at home.

  • 1½ pounds calamari, cleaned, rings + tentacles
  • 1 cup all-purpose flour
  • 1 cup semolina flour
  • 1 tsp kosher salt, plus more for finishing
  • 1 tsp black pepper
  • ½ tsp paprika (optional, for color)
  • 1 tsp garlic powder
  • Oil for frying ( peanut or light olive oil)
  • Lemon wedges, for serving
  • Marinara, for dipping
  1. Prep the calamari

    Slice tubes into ½-inch rings. Pat rings and tentacles completely dry with paper towels.(Drying is key for crispness!)

  2. Make the coating

    In a shallow bowl, whisk together: 1 cup all-purpose flour, 1 cup semolina flour, Salt, pepper, paprika, and garlic powder

  3. Heat the oil

    Pour oil into a heavy pot or deep skillet about 2 inches deep.Heat to 350–365°F.

  4. Coat the calamari

    Toss the rings and tentacles in the flour–semolina mixture until lightly coated.Shake off excess.

  5. Fry in batches

    Add calamari in small batches so the oil temperature stays stable.Fry 1½–2 minutes—just until pale golden.(Over-frying = chewy.)

  6. Drain & season

    Transfer to a paper towel–lined tray and sprinkle immediately with a pinch of salt.

  7. Serve

    Enjoy hot with lemon wedges and marinara.

Appetizer
Italian
Best Fried Calamari Recipe


Persimmon Carpaccio Salad (Italian Style)

Persimmon Carpaccio Salad (Italian Style)

This post may contain affiliate links, that help support this blog. If you make a purchase through these links, I may earn a commission—at no cost to you. For more information read my disclosure policy.

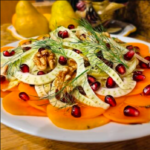
This elegant Persimmon Carpaccio Salad is a simple yet stunning Italian-inspired winter dish. If you love seasonal produce and beautiful plating, this recipe is going to be a favorite. Thinly shaved Fuyu persimmons create a vibrant, sweet base that pairs perfectly with peppery arugula, crisp shaved fennel, toasted walnuts, and salty Parmigiano. It’s light, fresh, and absolutely perfect for holiday gatherings, dinner parties, or as a bright starter to any Italian meal.

In Italy, carpaccio-style dishes are all about showcasing the beauty of the ingredients with minimal dressing—and persimmons shine beautifully prepared this way.

Things to know about this Persimmon Carpaccio Salad (Italian Style)

  • Use Fuyu persimmons, not Hachiya—Fuyus are firm and perfect for shaving paper-thin.

  • A mandoline gives the most even slices, but a very sharp knife works too.

  • This dish is best served immediately after dressing so the persimmons stay crisp.


Variations

  • Honey drizzle: Add a touch of honey if you prefer a sweeter profile.

  • With prosciutto: Lay thin prosciutto slices over the persimmons for a sweet–salty bite.

  • Citrus version: Add orange zest or a few citrus segments.

  • Add burrata: For a creamier dish, serve with small pieces of burrata.


Storage

This salad is best enjoyed fresh.
If prepping ahead:


Persimmon Carpaccio Salad (Italian Style)

This Italian Persimmon Carpaccio Salad is a beautiful fall and winter dish that lets sweet, ripe persimmons shine. Thinly sliced persimmons are layered carpaccio-style and finished with peppery arugula, shaved Parmesan, toasted nuts, and a simple lemon vinaigrette. Fresh, elegant, and bursting with seasonal flavor, it's perfect as a light appetizer or alongside roasted meats and holiday meals.

  • 3 ripe Fuyu persimmons, peeled and thinly shaved into rounds
  • 1 cup arugula
  • ½ small fennel bulb, shaved very thin
  • 2 tbsp toasted walnuts, roughly chopped
  • ¼ cup shaved Parmigiano-Reggiano
  • 1 – 2 tbsp extra virgin olive oil
  • 1 tbsp fresh lemon juice or a splash of white balsamic vinegar
  • Sea salt, to taste
  • Fresh cracked black pepper, to taste
  • Fennel fronds, for garnish
  • Optional: a sprinkle of pomegranate arils for color
  1. Lay out the carpaccio

    Arrange the thinly shaved persimmon slices in a beautiful overlapping layer on a large round platter.

  2. Add the vegetables

    Scatter shaved fennel on top. Add a small handful of arugula for freshness and contrast.

  3. Dress the salad

    Drizzle evenly with extra virgin olive oil and fresh lemon juice or white balsamic.

  4. Season

    Sprinkle lightly with sea salt and freshly cracked pepper.

  5. Finish

    Add toasted walnuts, shaved Parmigiano, and fennel fronds. Serve immediately.

Salad
Italian
Italian persimmon salad, persimmon carpaccio, fall salad recipe


Cabbage & Apple Holiday Slaw

Cabbage & Apple Holiday Slaw

This post may contain affiliate links, that help support this blog. If you make a purchase through these links, I may earn a commission—at no cost to you. For more information read my disclosure policy.

I think cabbage is underrated. It’s one of those ingredients we often overlook, yet it brings so much crunch, sweetness, and freshness to a holiday spread. While everyone gravitates toward the heavier, richer dishes this time of year, I always find myself craving something bright that cuts through all that indulgence. That’s where this Cabbage & Apple Holiday Slaw comes in.

It’s crisp, colorful, and so refreshing—shredded cabbage and carrots tossed with thin slices of sweet apple, toasted pecans for warmth, and just enough shaved Parmesan to give it that savory Italian touch. Then everything gets coated in a creamy apple-cider vinaigrette that ties it all together. It’s the kind of side dish that not only balances your table but also surprises people with how simple and delicious it is. I make it every year, and there are never leftovers.

Things to know about this Cabbage & Apple Holiday Slaw

This slaw is incredibly make-ahead friendly, which makes it perfect for busy holiday cooking. You can shred the cabbage and carrots, slice the apples, and even mix the dressing a day in advance—just keep everything separate until you’re ready to serve. The salad stays crisp for hours after dressing thanks to the sturdiness of the cabbage. You can also swap pecans for walnuts, add dried cranberries for a sweeter touch, or use Asiago instead of Parmesan for a sharper flavor. It’s a flexible, crowd-pleasing side dish that fits into any Christmas or holiday menu.

Variations

  • Cranberry Twist: Add dried cranberries or pomegranate seeds for color and sweetness.

  • Walnut & Blue Cheese: Use toasted walnuts and crumbled gorgonzola for a bold flavor.

  • Maple Dijon: Swap honey for maple syrup and add extra Dijon mustard.

  • Creamy Italian: Add Greek yogurt or sour cream to the dressing and include shaved fennel.

  • Apple & Pear: Use a mix of thinly sliced apples and pears.

  • Nut-Free: Replace nuts with pumpkin seeds or sunflower seeds.

  • Savory Version: Skip the honey and apple. Add red onion, extra vinegar, and red pepper flakes.

If you love fresh and festive holiday sides, pair this slaw with:


Cabbage & Apple Holiday Slaw

This Cabbage & Apple Holiday Slaw is a crisp, colorful side dish that's perfect for holiday gatherings and everyday meals alike. Fresh cabbage, sweet apples, and a bright, tangy dressing come together for a refreshing salad with the perfect balance of sweet and savory flavors. It's easy to prepare, can be made ahead, and pairs beautifully with roasted turkey, ham, pork, or grilled meats.

For the slaw

  • 4 cups shredded green cabbage
  • 1 cup shredded carrots
  • 2 large crisp apple, thinly sliced (Honeycrisp or Pink Lady)
  • 1 cup toasted pecans
  • 1 tbsp fresh or dried thyme
  • ½ cup shaved Parmesan (or Asiago)

Creamy Apple-Cider Vinaigrette

  • 1 cup plain Greek yogurt or mayonnaise
  • ⅓ cup olive oil
  • ⅓ cup apple cider vinegar
  • 1 tbsp honey
  • 1 tbsp Dijon mustard
  • 1 small garlic clove, grated
  • Salt and black pepper to taste
  1. In a large mixing bowl, combine the shredded cabbage, shredded carrots, apple slices, toasted pecans, shaved Parmesan, and thyme.

  2. In a separate small bowl, whisk together the mayo, olive oil, apple cider vinegar, honey, Dijon, grated garlic, salt, and pepper until smooth.

  3. Pour the dressing over the slaw and toss gently to evenly coat.

  4. Chill for at least 20 minutes before serving to let the flavors meld.

  5. Garnish with extra pecans and thyme before serving.

Salad
Italian


Milanese-Style Stuffed Chicken Breasts

Milanese-Style Stuffed Chicken Breasts

This post may contain affiliate links, that help support this blog. If you make a purchase through these links, I may earn a commission—at no cost to you. For more information read my disclosure policy.

In Italy, “Milanese-style” simply means breaded and pan-fried — a classic technique from Milan that gives chicken the most beautiful golden crust. Today I’m giving that tradition my own twist by stuffing the chicken with delicate prosciutto and melty provolone before searing it in the pan and finishing it in the oven. It’s elegant enough for company but easy enough for a weeknight, and the garlic Parmesan sauce pulls everything together in the most delicious way.

Things to know about these Milanese-Style Stuffed Chicken Breasts

Make Ahead:
You can assemble the stuffed, breaded chicken breasts up to 24 hours in advance. Keep them covered in the refrigerator, then simply sear and bake when you’re ready to cook. Perfect for entertaining or prepping dinner earlier in the day.

Freezing:
Uncooked stuffed chicken freezes beautifully. Place the assembled, breaded breasts on a baking sheet, freeze until solid, then transfer to a freezer-safe bag for up to 2 months. Thaw overnight in the refrigerator before searing and baking.

Leftovers & Storage:
Store cooked chicken in an airtight container in the refrigerator for up to 3 days. Reheat in a 350°F oven for 10–12 minutes to keep the breading crisp. Avoid microwaving — it softens the coating and can overcook the chicken.

Variations

  • Cheese: Swap provolone for fontina, or mozzarella, for different meltiness.

  • Meat: Use speck instead of prosciutto for a smokier flavor.

  • Herbs: Add fresh basil or parsley inside the chicken for brightness.

  • Breadcrumbs: Try panko for extra crunch or mix in more Parmigiano for a richer crust.

  • Sauces: Serve with marinara, lemon butter, or a simple white wine pan sauce if you want something lighter than the garlic Parmesan sauce.

  • If you enjoy this Milanese-Style Stuffed Chicken, you’ll love some of my other Italian chicken favorites already on the blog. Try my Italian-Style lemon Roast Chicken ( a Complete Meal) my  Stuffed Chicken Breast with mushroom sauce, or my  Italian stuffed meatloaf roll for another elegant, restaurant-quality dinner at home. And if you’re in the mood for cozy comfort, don’t miss my Creamy Sausage Tortellini Soup or Tortellini al Brodo — both reader favorites!


Milanese-Style Stuffed Chicken Breasts

These Milanese-Style Stuffed Chicken Breasts are a delicious twist on the classic Italian chicken cutlet. Tender chicken breasts are filled with a savory combination of Italian cheeses, herbs, and flavorful ingredients, then coated and cooked until golden and crisp on the outside while remaining juicy inside. Inspired by the flavors of Northern Italy, this elegant yet approachable dish brings restaurant-quality Italian cooking to your home table.

For the Chicken

  • 4 boneless, skinless chicken breasts
  • 4 slices prosciutto di Parma
  • 4 slices provolone or fontina cheese
  • 2 large eggs, beaten
  • 1 cup Italian-style breadcrumbs or
  • ½ cup grated Parmigiano-Reggiano with panko mixed
  • 1 tsp dried Italian herbs (oregano, basil, thyme)
  • Salt and pepper, to taste
  • 1 cup olive oil  for frying

For the Garlic Parmesan Sauce

  • 2 tbsp butter
  • 2 cloves garlic, grated
  • 1 cup heavy cream
  • ½ cup freshly grated Parmigiano-Reggiano
  • 1 lemon zest
  • 1 – 2 tbsp lemon juice
  • Salt and pepper to taste

Prep the Chicken

  1. Butterfly each chicken breast by slicing horizontally, almost through, and open like a book.

  2. Pound lightly to even thickness. Season with salt, pepper, and Italian herbs.

Assemble

  1. Place a slice of prosciutto and a slice of cheese inside each chicken breast.

  2. Fold the chicken over to enclose the filling. Secure with toothpicks if needed.

Bread the Chicken

  1. Add the Italian parsley to the egg whisk lightly Dredge each breast in the egg mixture, then coat with breadcrumbs mixed with Parmigiano . Press lightly to adhere.( no flour is necessary )

Sear

  1. Heat olive oil in a large pan over medium heat. Sear chicken 3–4 minutes per side until golden brown.

Bake

  1. Transfer seared chicken to an oven proof dish bake in a reheated 375°F (190°C) oven.

  2. Bake for 10 minutes, until chicken is cooked through (internal temperature 165°F / 74°C) and cheese is melted.

Make the Garlic Parmesan Sauce

  1. In a small saucepan, melt butter over medium heat.

  2. Add garlic and sauté until fragrant (about 30 seconds).

  3. Stir in heavy cream, simmer 2–3 minutes.

  4. Whisk in Parmigiano, lemon zest, and lemon juice.

  5. Season with salt and pepper to taste.

Serve

  1. Plate the baked chicken and drizzle with garlic parmesan sauce.

  2. Optional: serve with roasted vegetables, salad, or potatoes

Main Course
Italian
Italian stuffed chicken breast, chicken Milanese recipe,


Pan-Seared Salmon with Dill Sauce

Pan-Seared Salmon with Dill Sauce

This post may contain affiliate links, that help support this blog. If you make a purchase through these links, I may earn a commission—at no cost to you. For more information read my disclosure policy.

There’s nothing quite like a perfectly seared piece of salmon with a rich, creamy sauce — it’s the kind of dish that used to fly out of the kitchen at our Sonoma County restaurants .  With a busy place, I always loved keeping things simple but flavorful. This pan-seared salmon with a warm dill cream sauce is just that: restaurant-quality flavor made easy at home, ready in under 30 minutes.

Things to know about this Pan-Seared Salmon with Dill Sauce

  • Quick & Easy: From start to finish, this meal comes together in under 30 minutes — perfect for weeknights or a special weekend dinner.

  • Make-Ahead Options: You can prep the dill cream sauce ahead of time and gently reheat it before serving.

  • Pan Choice: A nonstick or stainless steel skillet works best for a crisp, golden sear.

  • Serving Ideas: Pair with steamed asparagus, roasted potatoes, or a light rice pilaf for a complete meal.

  • Storage: Leftover salmon and sauce can be stored separately in the fridge for up to 2 days. Reheat gently on low heat to avoid overcooking.

Variations

  • Herb Twist: Swap dill for tarragon, parsley, or chives for a different fresh flavor.

  • Cream Swap: Use half-and-half for a lighter sauce.

  • Citrus Kick: Add orange or lime juice instead of lemon for a subtle twist.

  • Garlic-Free: Omit the garlic for a milder sauce; caramelized onion alone adds plenty of flavor.

  • Love easy, restaurant-quality dinners at home? Try this creamy dill salmon and check out more salmon favorites on the blog: Salmon Florentine with Mushrooms or Salmon alla Puttanesca for a  bold spicy kick. And my personal favorite quick and easy salmon piccate for a light bright flavor Don’t forget to save this recipe and share it with friends!


Pan-Seared Salmon with Dill Sauce

This Pan-Seared Salmon with Dill Sauce is a simple yet elegant dish that comes together with restaurant-quality results at home. Perfectly seared salmon fillets develop a golden crust while staying tender and flaky inside, then are paired with a creamy, fresh dill sauce brightened with lemon. This easy seafood recipe is perfect for a quick weeknight dinner, special occasion, or a light Mediterranean-inspired meal

For the Salmon

  • 2 salmon fillets (about 6 oz each)
  • 2 tbsp olive oil
  • Salt & black pepper, to taste
  • 1 teaspoon garlic powder
  • 1 lemon wedge (for finishing)

For the Dill Sauce

  • 2 tbsp butter
  • 1 grated garlic clove
  • 2 tbsp grated onion
  • 1 cup heavy cream
  • ½ cup  white wine
  • 1 tbsp Dijon mustard
  • 1 tbsp lemon juice
  • 1 small garlic clove, grated
  • 2 tbsp fresh dill, finely chopped
  • 2 tbsp sour cream or plain Greek yogurt
  • Salt & pepper, to taste

Sear the Salmon

  1. Pat the salmon fillets dry and season both sides with salt, pepper, and garlic powder.

  2. Heat the olive oil  in a skillet over medium-high heat.

  3. Place the salmon skin-side down (if using skin-on) and cook for 4–5 minutes without moving, until the edges turn opaque and the skin is crisp.

  4. Flip and cook another 2–3 minutes, or until cooked to your liking.Transfer the salmon to a plate and set aside.

Make the Creamy Dill Sauce

  1. In the same skillet, lower the heat to medium and add the butter .

  2. Add the grated onion and grated garlic, sautéing until soft and fragrant, about 1–2 minutes.

  3. Add a small splash of lemon juice (optional). Deglaze the pan with the wine waiting until absorbed before continuing with the recipe.

  4. Pour in the heavy cream and bring to a gentle simmer. Let it cook for 2–3 minutes until slightly thickened. Stir in Dijon mustard, then season with salt and pepper.

  5. Remove from heat and stir in the fresh dill and 2 Tbsp. of sour cream or plain Greek yogurt

Serve

  1. Return the salmon to the pan or plate the fillets and spoon the warm dill cream sauce over top and more fresh dill. Serve with lemon slices

Main Course
Mediterranean
pan seared salmon, salmon with dill sauce, easy salmon recipe, lemon dill salmon, Mediterranean salmon recipe,


Creamy Broccoli Cheddar Soup

Creamy Broccoli Cheddar Soup

This post may contain affiliate links, that help support this blog. If you make a purchase through these links, I may earn a commission—at no cost to you. For more information read my disclosure policy.

In our diners — we had two of them over the years — soup was always a big part of the menu. No matter the season, our customers loved starting their meal with something warm and homemade. We made fresh soup every morning, and this creamy broccoli cheddar soup was one of the favorites. The smell of onions, garlic, and melted cheddar filled the kitchen, and before lunchtime, we’d already have regulars asking, “Is the broccoli soup ready yet?” It’s the kind of cozy, comforting bowl that takes me right back to those busy diner days.

Things to know about  Creamy Broccoli Cheddar Soup

This creamy broccoli cheddar soup is not only comforting but also incredibly easy to make — it’s ready in just 30 minutes! You can make it ahead of time and simply reheat it for a quick lunch or dinner. It’s also freezer-friendly, so you can store leftovers for later without losing any of that cheesy, creamy goodness.

For some tasty variations:

  • Add protein: Stir in cooked chicken or crispy bacon for a heartier meal.

  • Make it spicy: Sprinkle in extra red pepper flakes or a dash of cayenne for a little kick.

  • Veggie twist: Swap some of the broccoli with cauliflower or carrots for a slightly different flavor and color.

  • Cheese upgrade: Try mixing in Gruyère or smoked cheddar for a richer, deeper flavor.

This soup is versatile, quick, and perfect for busy weeknights or cozy weekends.

If you love this creamy broccoli cheddar soup, be sure to check out some of our other cozy favorites on the blog: try our creamy potato leek soup or Italian sausage gnocchi soup for more quick and comforting meals. Don’t forget to browse all our soup recipes for even more easy weeknight ideas! Just type in SOUP in the search bar. ENJOY!!!


Creamy Broccoli Cheddar Soup

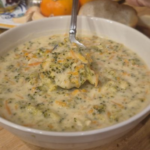
This Creamy Broccoli Cheddar Soup is a cozy, comforting classic made with tender broccoli, a rich cheese-filled broth, and the perfect balance of savory flavors. Smooth, creamy, and satisfying, this homemade soup is a family favorite for chilly days and makes a delicious lunch or easy dinner served with crusty bread. It’s a restaurant-style soup you can easily recreate at home.

  • 3 tbsp butter (or olive oil)
  • 1 cup grated onion
  • 2 cloves garlic, minced
  • 1 cup shredded carrots
  • 4 cups chopped broccoli florets
  • 2 tbsp all-purpose flour
  • 3 cups chicken or vegetable stock
  • 1 cup heavy cream
  • 2 cups shredded sharp cheddar cheese
  • 1 tsp red pepper flakes (optional, for a little heat)
  • Salt and freshly ground black pepper, to taste
  1. Sauté aromatics

    In a large pot, or Dutch oven melt the butter over medium heat. Add the grated onion and garlic, and cook for 2–3 minutes until fragrant and soft.

  2. Add vegetables

    Stir in the shredded carrots and chopped broccoli. Sauté for 3–4 minutes, just until the broccoli begins to soften.

  3. Make a light roux

    Sprinkle in the flour and stir to coat the vegetables evenly. Cook for about 1 minute to remove the raw flour taste.

  4. Add stock

    Gradually whisk in the chicken or vegetable stock, stirring constantly until smooth. Bring to a gentle simmer and cook for 10–12 minutes, or until the broccoli is tender.

  5. Add cream and cheese

    Lower the heat and stir in the heavy cream, followed by the shredded sharp cheddar. Stir until melted and creamy. Season with salt, pepper, and red pepper flakes.

  6. Serve

    Ladle into bowls and serve hot with extra cheddar on top and crusty bread on the side.

Soup
American


Italian Stuffed Meatloaf Roll (Polpettone Ripieno)

Italian Stuffed Meatloaf Roll (Polpettone Ripieno)

This post may contain affiliate links, that help support this blog. If you make a purchase through these links, I may earn a commission—at no cost to you. For more information read my disclosure policy.

This Italian-style meatloaf is a comforting twist on my family’s classic meatball recipe . The seasoned meat mixture is spread out, layered with Italian ham, provolone cheese, and steamed spinach, then rolled into a beautiful log and roasted until juicy and golden. It’s perfect for Sunday dinner or any night you want something hearty and impressive.

This meatloaf reminds me of the hearty, comforting meals my mother used to make on chilly Sundays. She always seasoned her meat like meatballs, with  garlic, parsley, and grated onion, and I’ve taken that same flavor base and turned it into a beautiful meat roll stuffed with ham, provolone, and spinach. It’s a dish that feels special enough for company but cozy enough for a family dinner — and the best part is slicing it to reveal that gorgeous spiral of filling inside.

Things to know about this Italian Stuffed Meatloaf Roll (Polpettone Ripieno)


Italian Stuffed Meatloaf Roll (Polpettone Ripieno)

Italian Stuffed Meatloaf Roll, known as Polpettone Ripieno, is a classic Italian comfort food that turns a simple meatloaf into an impressive family-style meal. A flavorful mixture of seasoned ground meat is rolled around a savory filling of cheese, cured meats, or vegetables, then baked until tender and golden. Sliced into beautiful spirals, this traditional Italian dish is perfect for Sunday dinners, holidays, and gatherings where you want a comforting meal with restaurant-quality presentation.

For the meat mixture

  • 2 pounds ground beef (or a mix of beef and pork)
  • 2 large eggs
  • 1 cup grated onion (with juices)
  • ½ cup milk
  • 1 cup bread crumbs
  • 3 slices stale bread torn into small pieces
  • ½ cup grated Parmigiano-Reggiano cheese
  • 2 cloves garlic, finely minced
  • 2 tbsp chopped fresh parsley
  • salt and pepper to taste
  • 1 tsp dried oregano
  • 1 tbsp olive oil

For the filling

  • 6 – 8 thin slices Italian ham (prosciutto cotto or mortadella)
  • 6 slices provolone cheese
  • 1½ cups steamed spinach, squeezed dry
  • Olive oil for brushing
  1. Prepare the meat mixture:

    In a large bowl, combine the  milk, eggs, grated onion (and its juices), Parmigiano, bread and breadcrumbs, garlic, parsley, salt, pepper,  and oregano mix well then add in the meat and mix just until well combined.

  2. Form the base:

    Lay a large piece of parchment paper or plastic wrap on a flat surface. Spread the meat mixture evenly into a rectangle about ½ inch thick.

  3. Layer the filling:

    Arrange the slices of ham over the meat, leaving a small border around the edges. Add the provolone on top, then spread the steamed spinach evenly over the cheese.

  4. Roll it up:

    Using the parchment paper to help, roll the meatloaf tightly into a log, sealing the ends as you go. Wrap it in plastic wrap and refrigerate for at least 1 hour (or overnight) to firm up.

  5. Roast:

    Preheat the oven to 375°F (190°C). Place the meatloaf seam-side down on a parchment-lined baking sheet or roasting pan. Brush lightly with olive oil.

  6. Bake:

    Roast uncovered for 50–60 minutes, or until the internal temperature reaches 160°F (71°C). Let it rest 10 minutes before slicing.

  7. Serve:

    Slice into rounds to reveal the beautiful swirl of ham, cheese, and spinach. Serve with roasted or mashed potatoes.

  8. Optional Pan Sauce

    Don’t let those flavorful pan drippings go to waste! After roasting, I like to make a simple Italian-style pan sauce right in the same pan. Whisk a little flour into the drippings to form a roux, then deglaze with white wine and warm broth. A touch of tomato paste adds richness, and finishing with a pat of butter gives it a silky shine. Spoon this savory sauce over the sliced meatloaf for a beautiful, restaurant-style finish.

Main Course
Italian
Italian stuffed meatloaf, polpettone ripieno, Italian meatloaf roll, stuffed meatloaf recipe,