Italian Spring Stew with Artichokes, Fava Beans & Peas (Vignarola Recipe)
Italian Spring Stew with Artichokes, Fava Beans & Peas (Vignarola Recipe)
This post may contain affiliate links, that help support this blog. If you make a purchase through these links, I may earn a commission—at no cost to you. For more information read my disclosure policy.
If you’ve ever wondered what to do with fresh fava beans, this Italian spring stew is the answer.
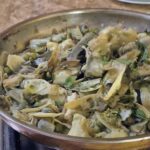
This dish, known as vignarola, comes from Rome and celebrates everything we love about spring cooking—simple ingredients, minimal fuss, and incredible flavor. Artichokes, sweet peas, and tender fava beans are gently simmered together until soft and silky, creating a light, brothy stew that feels both rustic and refined.
This vegetarian version keeps it fresh and vibrant while still full of classic Roman flavor.
Things to know about Italian Spring Stew with Artichokes, Fava Beans & Peas (Vignarola Recipe)
- Fully vegetarian and naturally light.
- Should be slightly brothy, not thick.
- Fresh fava beans taste best, but frozen works in a pinch.
- Artichokes take the longest—cook them first.
-
Variations
Pasta Version
Toss the finished vignarola with short pasta and a splash of pasta water for a simple spring pasta.Creamy Style
Blend a small portion of the vegetables and stir back in for a silkier texture.No Fava Beans?
Substitute with edamame or extra peas.
What to Serve with Vignarola
- Grilled or roasted vegetables
- Crusty bread for soaking up the broth
- Or enjoy it as a light main dish on its own
-
Storage
- Store in an airtight container in the fridge for up to 3 days.
- Reheat gently on the stovetop with a splash of broth or water.
- Freezing: This stew freezes well for up to 2 months. Thaw in the fridge overnight and reheat gently on the stove.
If you love simple, seasonal Italian cooking, this spring stew is one to keep on repeat. Save it for later, and don’t forget to try it as a pasta—it’s a game changer.
For more classic Italian recipes, check out:
- My asparagus lemon pasta
- My minestrone soup
- Or my personal favorite Annelletti al forno Authentic Sicilian baked pasta recipe
Italian Spring Stew with Artichokes, Fava Beans & Peas (Vignarola Recipe)
A classic Italian spring stew made with artichokes, fava beans, and peas. This traditional Roman vignarola recipe is fresh, simple, and full of seasonal flavor.
- 3 Tbsp. olive oil
- 1 cup chopped onion (you can use Spring onions)
- 2 Tbsp. minced garlic
- 3 artichokes (cleaned & sliced)
- 1 cup fava beans (peeled)
- 1 cup peas (shelled)
- 3 cups romaine lettuce (chopped)
- 1 cup white wine
- 1/2-1 cup vegetable stock
- salt and pepper to taste
-
Build the base Heat olive oil in a large pan. Add onions and garlic. Cook until soft and fragrant.
-
Cook the artichokes Add sliced artichokes first and cook for 5–7 minutes until they begin to soften.
-
Deglaze Pour in white wine (if using) and let it reduce slightly.
-
Add the vegetables Stir in fava beans, peas, and chopped romaine.
-
Simmer Add vegetable broth, cover, and cook on low for 15–20 minutes until everything is tender and silky.
-
Finish Season with salt and pepper. Stir in fresh mint or parsley right before serving.
Cleaning Artichokes: Fresh artichokes are beautiful but a little tricky to prep. Start by trimming the tough outer leaves and cutting off the sharp tips. Remove the stem and peel away any fibrous layers until you reach the tender heart. Slice and cook immediately to prevent browning, or toss with a little lemon juice. If you’d rather skip the prep, many grocery stores now sell pre-cleaned, trimmed artichoke hearts—perfect for a quick, no-fuss vignarola.