Chicken And Sausage Pasta

 Chicken And Sausage Pasta

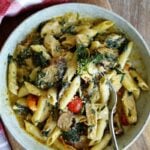
If you love pasta your going to love this  Chicken And Sausage Pasta recipe. Penne pasta tossed  in a creamy pesto sauce, with chunks of juicy chicken breast and Italian sausage, make this a restaurant quality dinner.

In most Italian kitchens pasta is a staple, it was in my house growing up and it still is today. Growing up most of the pasta was made by hand. I can still see my Mom rolling out the dough by hand, on a wooden board my father made for her.

There’s no doubt homemade pasta is the best, but with so many delicious commercial brands store bought is a good alternative. Pasta is still one of my go to staples when I need dinner quick, or I have unexpected company. it’s quick, easy, and so versatile it’s easy to please the pickiest eater.

Ever wonder why most restaurants have pasta on the menu??  Well the answer may be it’s too imitating for the home cook, IT”S NOT . You need dinner quick, on those busy weeknights, you have unexpected guests coming Pasta to the rescue.

Pasta is delicious plain and simple. Think olive oil, garlic, parmesan, cream,  herbs,  chicken and sausage and  you have a meal fancy enough for weekend dinners with friends.Customize  Chicken And Sausage Pasta

This  Chicken And Sausage Pasta recipe calls for easy ingredients you probably already have on hand, butter, garlic, cream, tomatoes,  chicken and Italian chicken sausage which together create a creamy, saucy Italian flavored dinner. And the best part is that you can mix and match ingredients to customize this recipe to your tastes.

You can substitute the chicken for tofu if your going the vegetarian route, using the same process. You don’t like chicken or sausage? Then  use shrimp adding it the last 5 minutes of cooking.

If your gluten free there are a lot of good gluten free pastas too. Use ingredients that fit your lifestyle and taste. I used my homemade pesto sauce, you don’t have too, store bought works just as well.

Here is the recipe  to make basil pesto, combine one bunch of basil, 1 cup parmesan cheese,  2 cups toasted walnuts

with 1 cup extra virgin olive oil pulse  blender   pouring the olive oil in last in a slow stream while pulsing. 

Please let me know your experience if you make this recipe, comments, feedback whatever you feel like talking about. That’s my favorite part and don’t forget to tag me on Instagram…….

Ingredients

  • 1 lb penne pasta
  • 2 boneless skinless chicken breast
  • 2 links chicken Italian sausage
  • 2 Tablespoons each olive oil and butter
  • 2 cups chopped spinach
  • 2 cups cherry tomatoes
  • 1 cup parmesan cheese
  • 1 small chopped onion
  • 2 tablespoons chopped garlic
  • 1 cup heavy whipping cream
  • 2 cups pesto sauce
  • 1 cup chicken stock
  • 1 cup reserved pasta water
  • 1 Tbs. each chopped Italian parsley, basil, and thyme
  • Salt and pepper to taste

Instructions

  1. Cook pasta according to package directions reserving 2 cups of the water before draining
  2. Mean while heat olive oil and butter in large saute pan
  3. salt and pepper chicken to taste
  4. Cut sausage into thick diagonal slices
  5. Add  chicken and sausage saute until golden
  6. Saute onion and garlic until tender
  7. Add tomatoes saute until  blistered about 10 minutes
  8. De glaze pan with chicken stock
  9. Add heavy whipping cream, pesto sauce and reserved pasta water
  10. Simmer until sauce thickens about 10 minutes
  11. And parmesan cheese, spinach, and  herbs last 5 minutes
  12. Toss drained pasta in the sauce
  13. Top with  the additional  parmesan and  Italian parsley
  14. Salt and pepper to taste


Flank Steak Skewers

Flank Steak Skewers

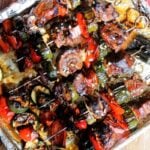
These Flank Steak Skewers are are all about Summer and this 4th of July weekend. A whole meal right here on these metal skewers, the steak, the vegetables and the flavor. Growing up in an Italian household our BBQ sauce consisted of a basic olive oil, garlic, lemon juice and herbs, still one of my favorites.

But today I wanted to share this quick and easy BBQ sauce that uses few ingredients you probably have on hand, is ready in 15 minutes. and comes out prefect every time.

The difference between the two is just a few  ingredient and sugar!!!  Because I added sugar, it also added an extra step, cooking it to melt the sugar.

Those little changes produced big results in terms of flavor. This recipe works well with chicken too, if you want something lighter.

Wood Verses Metal Skewers

In this Flank Steak Skewer recipe I used 12 inch long metal Skewers. Skewers come in a variety of lengths and materials.  Wooden bamboo too are a great option for camping trips or when you don’t want to have to wash metal ones. They’re inexpensive and typically quite sharp.

But there are a few downsides that you might want to consider  upgrading to reusable metal  skewers. Bamboo is a naturally fibrous and tends to split easily, what this means is you have to be careful you don’t end up with wood splinters in your meat.

They also burn, soaking wooden skewers in water for 30 minutes helps to prevent them from burning while cooking. I prefer metal skewers , which have a long life are reusable and thus easier on the environment. They won’t catch on fire , but you do need to be careful as they get incredibly hot. We’re in the grilling season and in my house meals on metal skewers and Summer go together.

Happy 4th of July my friends remember the reason for the celebration…..  The Land of the Free because of the Brave!!!

If you make this recipe please leave me a comment and don’t forget to tag me on Instagram hearing form is my favorite part!!!!

Ingredient

  • 1 cup balsamic vinegar
  • 1/4 cup red wine vinegar
  • 1/2 cup water
  • 1/2 cup brown sugar
  • 2 Tablespoons hot sauce
  • 2 lbs Flank steak
  • 1 Tablespoon each powered garlic, onion, smokey paprika, Worcestershire sauce
  • Salt and pepper to taste
  • 2 zucchini cut in thick rounds
  • 1 red and 1 green bell pepper cut in seeded and cut in large squares
  • 2 red onions cut in chunks
  • 1 Tablespoon each powered garlic, onion, smokey paprika, Worcestershire sauce
  • Salt and pepper to taste

Instructions

  1. Mix first 7 ingredients
  2. Simmer covered for 15 minutes
  3.  made a marinade for the meat and vegetables by whisking of 1 tablespoon each garlic, onion, and paprika powder, thyme,Worcestershire, 1/3 cup olive oil and juice from two lemons
  4. Cut steak into large cubes
  5. Put steak and marinade in a large plastic baggie and refrigerate for two hours or overnight reserving 1/4 cup to marinate the vegetables
  6. Preheat grill or indoor oven to 400
  7. Pour reserved marinade over cut vegetables
  8. Coat Flank steak in the balsamic BBQ sauce
  9. On medal skewers alternate layering the meat and vegetables
  10. Grill for 20 minutes or oven roast  basting the skewers with the BBQ sauce and turning to brown evenly


Turkey Meatball Garlic Toast

Turkey Meatball Garlic Toast

This post may contain affiliate links, that help support this blog. If you make a purchase through these links, I may earn a commission—at no cost to you. For more information read my disclosure policy.

I love Meatballs as much as I love Pasta and for the same reasons. They’re just so easy, delicious, versatile and everyone loves them. This meatball garlic toast uses my Mama’s traditional meatball recipe reconstruct to fit my lifestyle and taste, using ground Turkey breast. While ground turkey isn’t my favorite I use it when I want a healthier option, plus you can never go wrong with Meatballs.

Plenty of Parmesan with a few simple ingredients and plenty of fresh herbs, turned that flavorless ground turkey into something totally drool worthy.


Three Tips When Making This turkey meatball garlic toast

First  when mixing  the meat into the other ingredients don’t over mix or overcook, both lead to tough hard meatballs.

A case in point to the last sentence, a new prep cook was mixing the mixture in the dough mixer, and that explained why the meatballs were rock hard. There is no nice way to put it, they were not good.

The other thing to remember is that  the meatballs are cooked twice first roasted, then in the sauce, so it’s easy to overcook them. Roasting the meatballs adds another depth of flavor and beautiful  color.

I try to use my handy- dandy toaster oven whenever I can. I don’t like turning on my oven every time I need to toast something, my toaster oven is one of my most used small kitchen appliances, if you don’t have one they’re well worth the cost.

Third this is another custom-able recipe, if you like the traditional use a high grade ground beef, or a mixture of chicken, beef, or veal.

Experiment,  food and cooking is meant to be fun and enjoyable, I have simplified and gave you made ahead tips to make cooking a journey, not a destination always learning, always finding new ingredients to satisfy our changing life style and diet…..Have Fun!!! If you love Meatballs you may want to try these meatball recipes Mama’s best Italian meatballs or for a vegetarian option try my  Melanzane polpetta Italian eggplant meatballs.

Turkey Meatball Garlic Toast

Crispy garlic toast is topped with juicy homemade turkey meatballs, rich marinara, and melted cheese for a hearty Italian-inspired meal that's comforting and full of flavor.

  • 1 lb ground turkey breast
  • 6 slices crusty Italian Bread cut medium thick on a diagonal
  • 1 cup shredded mozzarella
  • 1 cup bread crumbs
  • ½ cup chopped  Italian parsley
  • ½ cup grated Parmesan
  • 1 egg
  • 2 tbsp each chopped garlic and onion
  • Salt and pepper
  • 4 cups my easy marinara sauce
  • 1 stick butter softened
  • ½ cup each mozzarella, parmesan and sharp cheddar
  • 3 tbsp each chopped Italian parsley, garlic and onion
  1. Preheat oven to 350

  2. In a bowl make the cheesy garlic butter by mixing the last 4 ingredients

  3. Spread the garlic mixture on the bread slices

  4. Toast for 10 – 15 minutes.

  5. Mix egg, bread crumbs, parsley, garlic, onion, parmesan salt and pepper ending with the meat

  6. Shape into golf size balls

  7. Roast in a preheated 350 oven until light golden brown about 10 minutes

  8. Cook an additional 20 minutes in simmering homemade marinara sauce

  9. Top garlic toast with 2 meatballs top with additional mozzarella

  10. Return to oven just to melt the cheese


Sweet and Tangy Balsamic BBQ Sauce Recipe

Sweet and Tangy Balsamic BBQ Sauce Recipe

This post may contain affiliate links, that help support this blog. If you make a purchase through these links, I may earn a commission—at no cost to you. For more information read my disclosure policy.

This sweet and tangy Balsamic BBQ Sauce is the best barbecue sauce that is both sweet and tangy is ready in 15 minutes and made from scratch.

BBQ sauce is one of those foods that differ from state to state you have Kansas City style, Memphis style, Texas style and many between. Everyone has their personal favorite. I like them all.

Growing up in an Italian household our BBQ sauce consisted of a basic olive oil, garlic, lemon juice and herbs, still one of my favorites.

But today I wanted to share this quick and easy BBQ sauce that uses few ingredients you probably have on hand, is ready in 15 minutes. and comes out prefect every time.


Things to know about this Sweet and Tangy Balsamic BBQ Sauce Recipe

When you make this Balsamic BBQ sauce as a made-ahead meal prep allow it to cool, then pour it onto mason jars. Seal it tight with a tight fitting lid and store it in the refrigerator to use for quick and easy meals throughout the week.

It’s the prefect sauce to use for pulled pork or chicken and keeps fresh in you fridge up to 2 weeks.

If you make this BBQ sauce please leave me a comment, let me know in what recipe you used it, and don’t forget to tag me on Instagram with your creations I love hearing from you!!! 

Sweet and Tangy Balsamic BBQ Sauce

Rich balsamic vinegar, brown sugar, and smoky spices simmer together to create a sweet and tangy BBQ sauce that's perfect for chicken, ribs, burgers, and more.

  • 2 cups ketchup
  • 1 cup water
  • 1 cup balsamic vinegar
  • ½ cup brown sugar
  • 2 tbsp hot sauce
  • 1 tbsp garlic powder
  • 1 tbsp onion powder
  • 1 tbsp smoked paprika
  • 1 tbsp Worcestershire sauce
  • Salt and black pepper to taste
  1. In a medium saucepan, combine all ingredients.

  2. Stir well and bring the mixture to a gentle simmer over low heat.

  3. Cover and let the sauce simmer for 15–20 minutes, stirring occasionally, until thickened to your liking.

  4. Taste and adjust seasoning with additional salt, pepper, or hot sauce if needed.

  5. Let the sauce cool before using. Store leftovers in an airtight container in the fridge for up to 1 week.


Crispy Chicken Tenders in the Air Fryer

Crispy Chicken Tenders in the Air Fryer

This post may contain affiliate links, that help support this blog. If you make a purchase through these links, I may earn a commission—at no cost to you. For more information read my disclosure policy.

My every first time using the air fry option on my Cuisinart toaster oven, and I have to say Am in love. There really is nothing better than fried chicken.

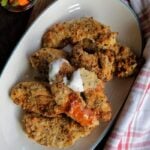
These parmesan and everything bagel seasoned, air fried chicken tenders are no exception. Delicious and guiltless these chicken tenders are baked to perfection using the air fry option on my Cuisinart toaster oven.   If you don’t have an air fryer NO problem use the oven fry method in the instructions.

Chicken tenders have always been one of my family’s favorite food. It’s one of those recipes  I know I can make in no time and the whole family will love. They come together in less then 30 minutes, I serve them with crispy celery sticks, buffalo hot sauce, ranch dressing, and marinara sauce. They’re prefect for Super Bowl Sundays, add a salad, some starch and you have an easy weeknight meal that’s delicious enough for Saturday night dinner with friends.

Things to know about this Crispy Chicken Tenders in the Air Fryer

I used whole boneless, skinless, chicken breast and cut them, you can use chicken tenders or boneless chicken thighs if that fits your taste.

The everything bagel seasoning adds fantastic flavor when mixed with the breadcrumbs and Parmesan, but it can be quite salty, so use it sparingly. If you’re air frying, spraying the chicken with cooking spray helps create an extra crispy crust—but it’s optional.

These chicken tenders are just as delicious cold or at room temperature, making them perfect for next-day meals. Plus, they freeze well, so any leftovers can be stored for a quick, ready-made meal later.

They’re air fried so you don’t have to feel guilty about eating more then you planned, I don’t.

In fact I eat one or two plain, right out of the oven, they can be addicting, and since I’ve discovered the awesomeness of  air frying, for sure I’ll be making them more often.

If you make this recipe please leave me a comment, and don’t forget to tag me on Instagram……. that’s my favorite part!!!!!! And if you love crispy chicken as much as i do try my crispy fried Buffalo chicken strips or crispy pan fried chicken cutlets


Crispy Chicken Tenders in the Air Fryer

Crispy Parmesan-crusted chicken tenders are air fried until golden and served with a buttery hot sauce for a flavorful meal that's easy enough for busy weeknights.

  • 3 boneless, skinless chicken breasts (about 6 oz each), cut into large strips or chunks
  • Salt and pepper, to taste
  • 2 cups Italian-seasoned breadcrumbs
  • 1 cup grated Parmesan cheese
  • 2 tbsp everything bagel seasoning
  • 1 tbsp each: chili powder, garlic powder, and Italian seasoning
  • 2 eggs, slightly beaten
  • ¼ cup milk
  • 1 tbsp hot sauce (plus more for dipping)
  • Ranch dressing, for dipping

For the Hot Sauce:

  • 1 stick butter (½ cup)
  • 1 cup hot sauce (preferably Frank’s RedHot)
  • 1 tbsp each: garlic powder, onion powder, and Italian seasoning
  • Parmesan cheese and chopped Italian parsley, for garnish
  1. Season chicken strips with salt and pepper.

  2. In a shallow bowl, whisk together eggs, milk, and 1 tablespoon hot sauce.

  3. In another bowl, combine breadcrumbs, Parmesan cheese, everything bagel seasoning, chili powder, garlic powder, and Italian seasoning.

  4. Dip each chicken strip into the egg mixture, then coat evenly with the breadcrumb mixture. Press lightly to adhere the coating.

  5. Air Fryer Method:

    Preheat air fryer to 400°F. Place chicken strips in the basket in a single layer (work in batches if needed). Air fry for about 15 minutes, turning halfway through, until golden brown and cooked through.

  6. Oven Method (if you don’t have an air fryer):

    Preheat oven to 400°F. Pour ½ cup olive oil onto a large baking sheet and place it in the oven until the oil is hot and slightly smoking. Carefully arrange the chicken strips on the hot sheet. Bake for about 20 minutes, flipping once, until golden brown and crispy on both sides.

  7. Make the Hot Sauce. In a small saucepan, melt the butter over low heat. Stir in hot sauce, garlic powder, onion powder, and Italian seasoning. Heat gently until warm and combined.

  8. Drizzle or toss the chicken with the hot sauce, or serve it on the side for dipping. Garnish with grated Parmesan and chopped Italian parsley. Serve with ranch dressing for dipping.