Authentic Italian Pasta alla Gricia Recipe
Authentic Italian Pasta alla Gricia Recipe
This post may contain affiliate links, that help support this blog. If you make a purchase through these links, I may earn a commission—at no cost to you. For more information read my disclosure policy.
If there Authentic Pasta alla Gricia recipe is one of the oldest and most iconic dishes of Roman cuisine. Originating in the area of Amatrice, in Lazio, this traditional pasta is often described as the tomato-free ancestor of Amatriciana.
Made with just four essential ingredients—pasta, guanciale, Pecorino Romano and black pepper—Gricia represents the purest expression of Roman culinary tradition. Its simplicity is deceptive: the balance between rendered guanciale fat and sharp Pecorino creates a creamy and intensely savory sauce without the addition of eggs or tomatoes.’s one pasta that deserves more attention, it’s Authentic Pasta alla Gricia. While Carbonara, Cacio e Pepe, and Amatriciana often steal the spotlight, Gricia is actually one of the oldest and most iconic recipes in Roman cuisine. Many consider it the original Roman pasta and the tomato-free ancestor of Amatriciana.
Growing up in Italy, I learned that the best recipes don’t rely on a long list of ingredients—they rely on quality ingredients prepared well. Pasta alla Gricia is the perfect example. Made with just pasta, guanciale, Pecorino Romano, freshly cracked black pepper, and starchy pasta water, this humble dish transforms a handful of simple ingredients into something incredibly rich and satisfying.
The magic is in the technique. As the guanciale slowly renders, it creates a flavorful base that combines with finely grated Pecorino Romano and pasta water to form a silky, creamy sauce—without a drop of cream, butter, eggs, or tomatoes. Every bite is
Things to know about this Authentic Italian Pasta alla Gricia Recipe
- Use guanciale if possible. This cured pork jowl is the traditional choice and gives Pasta alla Gricia its signature rich, savory flavor. Pancetta can work in a pinch, but it won’t have the same depth.
- Freshly grate the Pecorino Romano. Pre-shredded cheese doesn’t melt as smoothly and can make the sauce grainy.
- Save your pasta water. The starch in the cooking water is what creates the silky sauce and helps the cheese emulsify with the rendered guanciale fat.
- Finish the pasta off the heat. Tossing the cheese with the pasta away from direct heat prevents it from clumping and keeps the sauce smooth and creamy.
- Keep it simple. Authentic Pasta alla Gricia doesn’t include garlic, onions, butter, cream, or olive oil. The beauty of this Roman classic is letting a few exceptional ingredients shine.
Storage
Store leftover Pasta alla Gricia in an airtight container in the refrigerator for up to 3 days. Reheat gently in a skillet over low heat with a splash of water to loosen the sauce. Avoid microwaving on high, as the cheese can become oily and separate. This pasta is at its absolute best when served fresh, so I don’t recommend freezing it.
More Classic Roman Pasta Recipes
If you loved this Authentic Italian Pasta alla Gricia Recipe, be sure to complete your tour of Rome with the other three iconic pasta dishes:
- Authentic Cacio e Pepe – The simplest of the Roman classics, made with Pecorino Romano and freshly cracked black pepper.
- Authentic Pasta Carbonara – Creamy, rich, and made the traditional way with eggs, guanciale, Pecorino Romano, and black pepper.
- Authentic Bucatini all’Amatriciana – A bold Roman favorite featuring crispy guanciale, tomatoes, Pecorino Romano, and bucatini pasta.
Together, these four recipes make up the legendary Roman pasta collection, each showcasing how a few simple ingredients can create unforgettable Italian flavors.
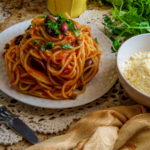
Authentic Pasta alla Gricia Recipe

Authentic Italian Pasta alla Gricia is one of Rome's oldest and most beloved pasta dishes. Made with guanciale, Pecorino Romano, black pepper, and starchy pasta water, this simple yet flavorful recipe creates a rich, silky sauce without eggs or tomatoes. Ready in just 25 minutes, it's a timeless Italian classic that's perfect for any night of the week.
- 1 lb. rigatoni or spaghetti
- 8 oz. guanciale, cut into ¼-inch strips
- 2 cups freshly grated Pecorino Romano cheese
- 1 Tbsp. freshly cracked black pepper, plus more to taste
- 2 cups reserved pasta water, as needed
-
Bring a large pot of salted water to a boil. Cook the rigatoni until al dente, according to the package directions. Before draining, reserve 1½ cups of the starchy pasta water.
-
Cook the guanciale. While the pasta cooks, place the guanciale in a large skillet over medium-low heat. Cook slowly for 8–10 minutes, stirring occasionally, until the fat has rendered and the guanciale is golden and crisp. Remove the skillet from the heat
-
Toast the pepper. Add the freshly cracked black pepper to the warm guanciale and stir for about 30 seconds, allowing it to become fragrant. For the best flavor, use whole black peppercorns and crack them just before cooking. You can do this with a mortar and pestle for a rustic, coarse grind, or place the peppercorns in a zip-top bag and gently crush them with a rolling pin or the bottom of a heavy skillet. Freshly cracked pepper has a much bolder aroma and is essential to the authentic flavor of Pasta alla Gricia.
-
Combine the pasta and guanciale. Transfer the drained pasta directly to the skillet and toss well to coat it in the rendered guanciale fat. Add about ½ cup of the reserved pasta water and toss to combine.
-
Create the sauce. Let the skillet cool for about 30 seconds so it's no longer piping hot. Gradually sprinkle in the grated Pecorino Romano while continuously tossing the pasta. Add more pasta water, a few tablespoons at a time, until a smooth, silky sauce coats every piece of pasta.
-
Adjust the consistency. Continue tossing until the sauce is creamy and glossy. If it becomes too thick, add a little more pasta water. If it's too thin, toss for another minute until it emulsifies.
-
Serve immediately. Divide among warm bowls and finish with extra Pecorino Romano and a generous crack of black pepper. Serve immediately while the sauce is silky and hot.