One-Pot Creamy Zucchini Pasta (Pasta e Zucchini)
One-Pot Creamy Zucchini Pasta (Pasta e Zucchini)This post may contain affiliate links, that help support this blog. If you make a purchase through these links, I may earn a commission—at no cost to you. For more information read my disclosure policy.
This creamy zucchini pasta is made the same way many Italian home cooks prepare pasta with peas—everything cooks together in one pot.
The zucchini slowly soften with onion and olive oil, then the pasta cooks directly in the same pot with water or broth. As the pasta releases its starch, the sauce becomes naturally creamy without adding any cream.
It’s simple, comforting, and exactly the kind of rustic dish you’ll find in Italian kitchens during zucchini season.
With minimal ingredients and just one pot, it’s the perfect weeknight pasta.
things to know about this One-Pot Creamy Zucchini Pasta (Pasta e Zucchini ) recipe
Cut the zucchini small
Dicing the zucchini into small cubes helps them soften and melt into the sauce.
The pasta water
The starch from the pasta water is what helps create the creamy texture without adding cream.
Don’t rush the zucchini
Letting them cook slowly allows them to soften and develop flavor.
Storage
Store leftover zucchini pasta in an airtight container in the refrigerator for up to 3 days.
Reheat gently in a skillet with a splash of water or broth to loosen the sauce.
More Italian Pasta Recipes
If you love simple Italian pasta dishes, you might also enjoy:
These recipes use the same philosophy of Italian cooking—simple ingredients, cooked well.
Final Thoughts
Creamy zucchini pasta proves that you don’t need complicated ingredients to make something delicious. With a few zucchini, olive oil, onion, and pasta, you get a comforting Italian dish that feels both rustic and elegant.
Perfect for busy weeknights or when your garden is overflowing with zucchini.
One-Pot Creamy Zucchini Pasta (Pasta e Zucchini )
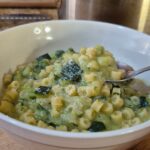
This one-pot creamy zucchini pasta is a traditional Italian recipe where pasta cooks directly with zucchini, onion, and olive oil, creating a naturally creamy sauce with Parmesan and pasta starch.
- 12 0z. small pasta (ditalini, small shells, or broken spaghetti)
- 3 medium zucchini (small dice)
- 1 small onion (chopped)
- 3 Tbsp. olive oil (extra virgin)
- 3 cups water or light broth
- 1 cup grated parmesan
- 1/2 cup Italian parsley (chopped)
- salt and pepper to taste
-
1. Sauté the base
In a large pot or deep skillet, heat the olive oil over medium heat.
Add the chopped onion and cook until soft and translucent, about 4–5 minutes.
Add the diced zucchini, season with salt and black pepper, and cook for 5–6 minutes until they begin to soften.
-
2. Add the pasta
Add the dry pasta directly to the pot.
Pour in about 3½ cups water or broth, just enough to cover the pasta.
Bring to a gentle simmer.
-
3. Cook everything together
Cook the pasta, stirring occasionally so it doesn’t stick.
As the pasta cooks, the liquid will reduce and the starch will create a creamy sauce.
If needed, add a little more water as it cooks.
This should take about 10–12 minutes, depending on the pasta.
-
4. Finish the pasta
When the pasta is tender and the sauce is creamy, remove from heat.
Stir in the grated Parmesan cheese until the pasta becomes silky and coated.
Taste and adjust seasoning.
-
5. Serve
Serve hot with extra Parmesan and parsley if desired.