Cranberry orange ricotta cookies

Cranberry Orange Ricotta Cookies

This post may contain affiliate links, that help support this blog. If you make a purchase through these links, I may earn a commission—at no cost to you. For more information read my disclosure policy.

These cranberry, orange ricotta cookies are full of holiday cheer. The scent of oranges with the sweetness of cranberries feels like a warm hug from a loved one on a chilly December night. Passed down from memories of bustling family gatherings, they combine the delicate tang of citrus with the creamy taste of ricotta, creating a balance between tradition and indulgence.  Whether  nestled on a festive cookie platter or enjoyed with a cup of espresso or tea.

Three useful tips when making cranberry orange ricotta cookies

  1. Use fresh Ingredients: For the best flavor use fresh orange zest and juice. They provide a bright tangy kick that complements the sweetness of the cranberries and the creamy ricotta. You can use whole milk or low fat ricotta in this recipe.
  2. Don’t overmix the dough: Ricotta cookies have a tender cake- like texture. Overmixing the dough after the flour has been added can develop too much gluten, resulting in denser cookies. Mix just until the ingredients are combined for the lightest results.
  3. Chill the dough: I believe all cookie doughs should be chilled. This is especially true for ricotta cookies. The dough can be sticky due to the ricotta , so chilling it for 30 minutes makes it easier to handle and ensures the cookies hold their shape while baking. Chilling cookie dough also helps to develop flavor. Cranberry orange cookies are the perfect blend of festive flavors and soft texture, making them a standout   festive treat for the holiday season.

    Storage

    Store the cookies in an airtight container at room temperature for 3–4 days. If glazed, place parchment between layers to keep them from sticking. They can also be frozen, unglazed, for up to 2 months. Thaw completely before glazing.

    If you love soft, traditional Italian-inspired cookies, try these next:

    • Italian Rainbow Cookies – colorful almond layers with jam and chocolate.
    • Italian Struffoli – golden little balls of fried dough coated in honey and sprinkles.
    • Italian Biscotti – crisp, classic cookies perfect with coffee.

      Helpful Baking Tools

      • Baking Sheets – A good-quality rimmed baking sheet is a kitchen essential for cookies and other baked goods.
      • Parchment Paper – Makes removing cookies easy and helps with cleanup.
      • Cookie Scoop – Helps make evenly sized cookies so they bake at the same rate.
      • Cooling Rack – Allows air to circulate around the cookies so they cool without becoming soggy underneath.


Cranberry Orange Ricotta Cookies

These Cranberry Orange Ricotta Cookies are soft, tender Italian-inspired cookies filled with dried cranberries and fresh orange flavor. Topped with a simple orange glaze, they’re a beautiful addition to a Christmas cookie tray or holiday dessert table.

  • 1 stick of room temperature butter
  • 1 1/2 sugar
  • 1 cup of ricotta
  • 1 egg
  • 1 Tbsp. vanilla
  • zest and juice from 1 small orange
  • 2 1/2 cups of flour
  • 1 tsp. baking powder
  • 1 tsp. baking soda
  • 2 cups dried cranberries
  • powder sugar glaze 2 cups powder sugar juice from one orange.
  • Sprinkles
  1. In a bowl start by creaming the butter and sugar together until light.

  2. Add the ricotta, egg, orange zest, vanilla and the juice from the orange. beat until light and fluffy.
  3. Mix the baking powder and baking soda with the flour. Add the flour mixture to the butter mixture. Mix only until well combined. Then fold in the cranberries.
  4. Drop by Tablespoon on a parchment lined cookie sheet bake in a per heated 375-degree oven for 10 -12 minutes.
  5. Let cool before drizzling with the powder sugar glaze and topping with sprinkles.

Don’t overbake these cookies. Ricotta keeps the cookies wonderfully soft, so take them out when the edges are just set and lightly golden. Let them cool completely before adding the orange glaze.

cookies, Dessert
Italian
cranberry orange ricotta cookies,


Spiced chocolate walnut cookies

Spiced Chocolate Walnut Cookies

This post may contain affiliate links, that help support this blog. If you make a purchase through these links, I may earn a commission—at no cost to you. For more information read my disclosure policy.

The holidays are a time for nostalgia and sweet indulgence, and what better way to capture the seasons magic than spiced chocolate walnut cookies. These rich , flavorful treats combine the warmth of holiday spices, the crunch of walnuts, and the decadence of chocolate, creating a cookie that feels as comforting as a crackling fire on a cold winter night.

Perfect for cookie exchange, dessert platters or enjoying with your favorite warm drink. These cookies are a holiday essential you will want to make more often than just the holiday season.

Tips when you make these spiced chocolate walnut cookies

  1. Use fresh spices: Spices lose potency after some time. Fresh cinnamon, nutmeg and cloves deliver the best flavor.
  2. Measure carefully: Avoid dense cookies by properly measuring the flour- don’t pack it !
  3. Chill the dough: Refrigerate the dough to prevent spreading and deepen flavors
  4. Don’t overbake: pull the cookies when the edges are set but the centers look slightly soft- they will firm up as they cool
  5. Storing the cookies: Keep cookies soft by storing them with a slice of bread in an airtight container, or they can be frozen and thawed out when you are ready to serve. Follow this simple tips for cookies that are perfectly chewy, spicy and irresistible!!

    If you love homemade cookies, be sure to try more of my Italian-inspired favorites. From soft, almond-flavored amaretti to crisp, twice-baked biscotti, there’s always something sweet baking in my kitchen.

    Italian Ricotta Cookies] – Soft, tender cookies made with ricotta cheese and finished with a sweet glaze. They have a delicate texture and are a favorite for holiday cookie trays.

    Amaretti Cookies– Soft and chewy Italian almond cookies with a deliciously rich almond flavor. A classic Italian treat that’s perfect with coffee.

    Twice-Baked Biscotti– Crisp, golden Italian cookies baked twice for that signature crunch. Perfect for dipping into your morning coffee or enjoying as an afternoon treat.

    Try these delicious Italian-inspired cookies next and bring a little taste of Italy to your kitchen!

    Baking Tools You’ll Need

    A few simple kitchen tools make baking these cookies easy. Here are some of the items I use in my kitchen:

    • Baking Sheets– Heavy-duty baking sheets for evenly baked cookies.
    • Parchment Paper – Makes cleanup easy and helps keep cookies from sticking.
    • cookie scoop – Helps you portion the dough evenly so the cookies bake at the same rate.
    • Wire Cooling Rack– Lets the cookies cool properly without becoming soggy underneath.

    I may earn a small commission from qualifying purchases at no additional cost to you.


Spiced Chocolate Walnut Cookies

These Spiced Chocolate Walnut Cookies are rich, chocolatey, and full of warm spices. Loaded with crunchy walnuts and a delicious chocolate flavor, these homemade cookies are perfect for holiday baking, cookie exchanges, or enjoying with a cup of coffee. Easy to make and full of cozy flavor, they’re a delicious treat for any occasion.

  • 1 stick of butter at room temperature
  • 1 1/2 cups sugar
  • 2 eggs
  • 1 Tbsp. vanilla
  • 2 1/2 cups flour
  • 1/3 cup unsweetened chocolate cocoa
  • 1 cup chopped walnuts
  • 1 Tsp. each cinnamon + nutmeg + cloves
  • 1 Tsp. baking powder
  • 1 Tsp. baking soda
  • 1 cup powder sugar
  1. Pre heat your oven to 375-degrees

  2. In a bowl cream together the butter and sugar until light and fluffy.
  3. Add in the vanilla and egg and mix until well combined
  4. Mix the flour with the baking powder, baking soda, cinnamon, nutmeg, cloves and cocoa powder
  5. Add the flour mixture to the egg mixture and mix until well mixed. Then mix in the walnuts.
  6. Roll the cookie dough into tablespoon size balls. Roll in the powder sugar
  7. bake on a parchment lined cookie sheet for 10 -12 minutes.

Don’t overbake these cookies. Take them out when the edges are set but the centers still look slightly soft. They’ll continue to bake on the hot baking sheet and stay deliciously tender.

cookies, Dessert
Italian
spiced chocolate walnut cookies,


Rustic Italian ricotta almond cake

Rustic Italian Ricotta Almond Cake

This post may contain affiliate links, that help support this blog. If you make a purchase through these links, I may earn a commission—at no cost to you. For more information read my disclosure policy.

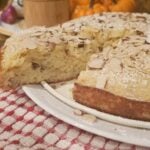
There is something special about Italian desserts- simple, elegant and always full of flavor. Among these treasures is one of my favorites rustic Italian ricotta almond cake. A treat that brings together the delicate nuttiness of almonds and the rich creaminess of ricotta. This cake is a  piece of Italian tradition, often shared during celebrations or afternoon coffee. It’s light with a moist texture with subtle sweetness.

The beaty of this cake is it’s simplicity and rustic charm. It doesn’t rely on heavy frostings or fancy decorations- just high- quality ingredients and a recipe passed down through generations. Whether you’re recreating memories of family gatherings or exploring Italian culinary, rustic Italian Ricotta almond cake is one to try.

Three Tips for success when making Rustic Italian ricotta almond cake

  • Use high quality ingredients: opt for full fat ricotta for creaminess and moisture.
  • Chop the almonds fine for a smooth texture, and ensure your eggs are at room temperature to mix evenly.
  • Incorporate air into the batter: Beat the eggs and sugar thoroughly to create a light and airy mixture. This step ensures the cake has a delicate crumb.

Don’t overbake: Bake the cake just until the edges are golden and the center is set but slightly soft. Overbaking can make the cake dry and dense. Use a toothpick test to check- it should come out with a few moist crumbs, not wet batter. This  rustic Italian ricotta almond cake is a delicious blend of easy and elegance , perfect for any occasion.

Ricotta gives this cake its soft, moist texture while almond flour adds a subtle nutty flavor. For the best texture, use whole-milk ricotta and drain off any excess liquid before adding it to the batter.

Storage

Store covered at room temperature for up to 2 days, or refrigerate for up to 5 days. Bring refrigerated cake to room temperature before serving for the best texture.

Freezing

Wrap individual slices tightly and freeze for up to 3 months. Thaw overnight in the refrigerator or at room temperature.

What to Serve With It

  • Fresh berries
  • Powdered sugar
  • Whipped cream
  • Freshly sliced fruit
  • Espresso or Italian coffee


More Italian-inspired desserts to try:

Italian Rainbow Christmas Cookies  Colorful almond-layered cookies with rich chocolate and a classic Italian bakery flavor.

Cranberry Orange Ricotta Cookies— Soft, tender ricotta cookies with bright orange and tart cranberries.

Lemon Blueberry Semifreddo A creamy frozen Italian dessert bursting with fresh lemon and blueberries.

Struffoli Little balls of fried dough tossed in honey and topped with festive sprinkles.

Italian Panna CottaLittle balls of fried dough tossed in honey and topped with festive sprinkles. 

Rustic Italian Ricotta Almond Cake

This rustic Italian ricotta almond cake is soft, moist, and lightly sweet with a delicate almond flavor. Made with creamy ricotta and almond flour, it’s an easy Italian-inspired dessert that’s perfect with coffee, tea, or for a simple after-dinner treat.

  • 3 eggs
  • 1 1/2 cups of sugar
  • 1 stick room temperature butter
  • 2 tsp. almond extract
  • 2 cups ricotta cheese
  • 2 cups of flour
  • 1 Tbsp. baking powder
  • 1 cup almonds finely chopped
  • powder sugar and 1/2 cup sliced almonds
  1. Preheat your oven to 375-degrees

  2. In a bowl beat the eggs and sugar until light and fluffy
  3. Then add in the butter, ricotta and the almond extract and beat until well combined
  4. Mix the baking powder with the flour
  5. Add the flour to the egg mixture and mix until well combined. Fold in the chopped almonds.
  6. pour the batter into a greased 8 inch spring form pan.
  7. Bake in the a preheated 375-degree oven for 40-45 minutes or until a toothpick comes out clean.

  8. Let cool slightly before removing from the pan.
  9. Top with powder sugar and the sliced almonds.

Don’t overmix the batter once the flour is added. Mix just until everything is combined to keep the cake tender and moist.

cake, Dessert
Italian
ricotta almond cake


Three ingredient caramel sauce

Three Ingredient Caramel Sauce

This post may contain affiliate links, that help support this blog. If you make a purchase through these links, I may earn a commission—at no cost to you. For more information read my disclosure policy.

I almost didn’t write this three ingredient caramel sauce recipe. It felt almost too simple to share. But then I realized the often the easiest recipes the ones you can whip up with minimal effort and ingredients deliver the most flavor. This caramel sauce is exactly that: rich, buttery and velvety smooth made with just three pantry ingredients. Whether you are drizzling it over my pumpkin pie bundt cake , pouring it over pancakes, or using it as a dip for apple slices, it’s a recipe you will come back to time and time again.

Why this three ingredient caramel sauce is so good

A three- ingredient caramel sauce is a game changer because of it’s simplicity and how delicious it is.

1: Minimal ingredients: Made with just sugar, butter and cream, it delivers a luxurious, buttery caramel flavor

2: Perfect texture: The combination of butter and cream creates a silky, pourable consistency that’s perfect for drizzling over desserts like , ice cream , pancakes or your upcoming pumpkin pie bundt cake.

3; It’s easy to make: With only three ingredients, it’s foolproof  and approachable, even for beginners. Plus you can make it in less than 15 minutes.

4: Customizable: Once you master the basic recipe, you can elevate it by adding a pinch of sea salt for salted caramel sauce or a splash of vanilla for extra flavor. It’s simple, satisfying and versatile- what’s not to love?

Storage

Store cooled caramel sauce in an airtight container in the refrigerator for up to 2 weeks. Reheat gently in the microwave or in a saucepan over low heat, adding a small splash of cream if needed to loosen the sauce.

How to Use It

Drizzle over ice cream, cheesecake, apple desserts, pancakes, waffles, brownies, cakes, or fresh fruit. It also makes a delicious topping for your morning coffee.

Make Ahead

The caramel sauce can be made several days ahead and refrigerated. Warm gently before serving.

Try More Easy Dessert Recipes

If you love making simple desserts from scratch, you’ll want to try a few more of my favorites. This Three-Ingredient Caramel Sauce is especially good drizzled over my PUREED APPLE walnut BUNDT Cake or  a scoop of your favorite ice cream.

And if you’re looking for more Italian-inspired sweets, check out my Spiced Chocolate Walnut Cookies,  Italian Amaretti Cookies,  and Twice-Baked Italian Biscotti

A few kitchen tools I use and recommend:


Three Ingredient Caramel Sauce

A rich, buttery homemade caramel sauce made with just three simple ingredients. This easy caramel sauce comes together quickly and is perfect for drizzling over desserts, fruit, ice cream, cakes, and more.

  • 2 cups of sugar
  • 1/2 stick of butter
  • 1 cup heavy cream
  1. Start by adding the sugar to a non-stick pan. Cook the sugar over medium low heat until a golden amber color (about 5 minutes) stirring continuously with a wooden spoon.

  2. Add in the butter waiting until it melts before adding in the cream. Keep stirring the caramel sauce until all the sugar is melted. And the sauce is velvety smooth ( about 4-5 minutes)

Keep a close eye on the caramel as it cooks. Once the butter, brown sugar, and cream come together, stir continuously until smooth and glossy. The sauce will thicken as it cools, so don’t cook it too long trying to make it thick in the pan.

Dessert
American
homemade caramel sauce


Pumpkin spice bundt cake

Pumpkin Spice Bundt Cake

This post may contain affiliate links, that help support this blog. If you make a purchase through these links, I may earn a commission—at no cost to you. For more information read my disclosure policy.

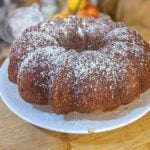
There is nothing quite like the comforting flavors of pumpkin pie during the holiday season-but what if you could enjoy those same warm spices in a moist and beautifully presented  bundt cake?  This pumpkin spice bundt cake combines the best of both worlds. full of rich spiced flavors of a classic pumpkin pie in a show stopping dessert that’s perfect for holiday gatherings.

My husband is not a fan of pumpkin pie. This pumpkin pie bundt cake is a delicious alternative to the classic pumpkin pie, especially for those who aren’t fans of it’s custard texture but still like the warm flavors. This cake bridges the gap deliciously, full of all the fall flavors in a bundt cake form.

Key points of this pumpkin spice bundt cake

  1. Moist and delicious: Thanks to the pumpkin puree the cake stays moist and rich.
  2. Warm spices: The cake is spiced with the traditional pumpkin pie blend, making every bite comforting and nostalgic
  3. No custard texture: unlike pumpkin pie, this cake doesn’t have the creamy pudding- like consistency, which may be unappealing to some ( like my husband)
  4. It’s pretty: The bundt cake adds elegance, making it a showstopper for holiday gatherings.
  5. Versatile toppings: Enhance it with a dusting of powder sugar , caramel sauce or a dollop of whipped cream. Share the joy of this pumpkin pie Bundt cake with family and friends and make every gathering a little sweeter.

    Storage

    Store the completely cooled cake covered at room temperature for up to 3 days, or refrigerate if topped with a cream cheese or dairy-based frosting. The unfrosted cake can also be wrapped tightly and frozen for up to 3 months.

    Serving Suggestion

    Serve with powdered sugar, vanilla glaze, cream cheese glaze, or a dollop of whipped cream. It’s also delicious with a cup of coffee or espresso.

    Make Ahead

    Bake the Bundt cake a day ahead and keep it tightly covered at room temperature. Add the glaze or powdered sugar shortly before serving.

    More Fall Baking You’ll Love

    If you love the warm spices and cozy flavors in this Pumpkin Spice Bundt Cake, try some of my other fall favorites, including Rustic Italian Ricotta Almond Cake, Spiced Chocolate Walnut Cookies, and Pureed apple and walnut cake. They’re all perfect for a fall dessert table or a cozy afternoon with coffee.

    Kitchen Tools for This Recipe


Pumpkin Spice Bundt Cake

This Pumpkin Spice Bundt Cake is a moist, tender fall cake filled with warm cinnamon and pumpkin spice flavors. It’s easy to make, beautiful enough for a holiday table, and delicious served with a dusting of powdered sugar or a simple glaze.

  • 3 eggs
  • 1 1/2 cups of sugar
  • 1 cup canola oil
  • 1 cup pumpkin puree
  • 1 Tbsp. vanilla
  • 2 1/2 cups of flour
  • 2 Tbsp baking powder (baking powder)
  • 2 Tsp. pumpkin pie spice
  • 1 tsp. cinnamon
  1. Preheat your oven to 350- degrees

  2. In a bowl beat the eggs with the sugar until light and fluffy. Then add the oil, pumpkin and vanilla and mix until well blended
  3. Mix the flour with the baking powder, pumpkin spice and cinnamon
  4. Add the flour mixture to the egg mixture and mix only until well combined.
  5. Pour into a 9 cup greased bundt pan. Bake in a preheated 375- degree oven for 35- 40 minutes or until a tooth pick comes out clean
  6. Let the cake cool slightly before removing from the pan.
  7. Top with powder sugar or caramel sauce.

Tip text
Don’t overmix the batter once the flour is added. Mix just until the ingredients are incorporated for a tender, moist cake. Be sure to generously grease and flour your Bundt pan, especially around all the details and curves, so the cake releases easily.

Appetizer
Mediterranean
pumpkin spice bundt cake,


Italian Fennel Taralli

Italian Fennel Taralli

This post may contain affiliate links, that help support this blog. If you make a purchase through these links, I may earn a commission—at no cost to you. For more information read my disclosure policy.

Taralli, a classic  Italian crunchy salty snack. kind of like a bread stick, shaped in a circle. They are made with a few simple ingredients, flour. olive oil and wine, and flavored with different herbs, like rosemary, oregano. or my personal favorite fennel seeds.

Growing up with them I remember the smell  of the fennel seeds baking and the unique twist of each ring. They’re such a classic Italian snack, perfect with a glass of wine or just a bite between meals. In every crunchy bite of Italian fennel  taralli  there is a  connection to  Italy’s rich culinary heritage and comforting reminders of childhood.

here are some ways to eat Italian fennel taralli

Growning up, you’d see the adults enjoying Taralli – those crunchy fennel- flavored snacks with a glass of red wine. They would dunk the taralli in the wine, letting them soak up a bit of the rich flavors before savoring every bite. it was a classic pairing, bring together the savory fennel with the earthy depth of red wine, creating a taste of tradition. Taralli  are versatile and can be enjoyed in more ways than just dunking in wine. They pair beautifully with a spread of Italian cheeses and cured meats, the perfect alternative to breadsticks.

Try dipping taralli in extra virgin olive oil seasoned with balsamic vinegar, black pepper and oregano. Or serve taralli with a variety of dips like olive tapenade, artichoke dip or even whipped ricotta. Enjoy taralli alongside a bowl of soup. they add a crunchy contrast to creamy soups. I use them crumbled over salads for extra crunch.

Whether you’re  sharing them with friends or savoring them solo, Italian fennel taralli  bring a little taste of Italian tradition.

Italian Fennel Taralli

  • 3 cups of flour
  • 1 tsp. baking powder
  • 1 Tbsp. salt
  • 1 Tbsp. fennel seeds
  • 1/2 cup olive oil
  • 1 cup white wine
  1. Start by combining the flour, salt , baking powder and fennel seeds in a bowl. Make a well in the center add the olive oil and white wine.

  2. combine using your hands until a dough starts to form. Then knead the dough until smooth about 5 minutes. form into a disk cover and let rest for 30 minutes,
  3. Meanwhile preheat your oven to 375 – degrees and bring a large pot of water to a boil add 1 Tbsp. of salt.
  4. Flour a work surface lightly cut the dough into 15 equal pieces . roll the dough into pencil thin 6 inch ropes. Form into a circle. pressing the ends together tightly using your hands.
  5. Drop a few Tarelli at a time into the boiling salted water. Once they float to the top, about 5 minutes remove and set a clean kitchen towel to dry out. Repeat the process until all the tarelli are boiled. Then let them dry completely before baking in the preheated oven for 15to 20 minutes or until golden brown and crispy.


Baked gorgonzola stuffed pears

Baked Gorgonzola Stuffed Pears

This post may contain affiliate links, that help support this blog. If you make a purchase through these links, I may earn a commission—at no cost to you. For more information read my disclosure policy.

When it comes to creating an easy fall appetizer that’s as elegant as it easy to make. baked gorgonzola- stuffed pears are the perfect choice. The natural sweetness of ripe pears with the creamy bold creamy flavors of gorgonzola, and the crunch of walnuts resulting in an appetizer that’s delicious. When baked the pears become tender, while the gorgonzola melts into a creamy, tangy deliciousness.  Whether served as a starter or a elegant snack these baked gorgonzola stuffed pears  are sure to become a favorite for their simplicity and flavor.

What to use for this baked gorgonzola stuffed pear recipe

Choose slightly underripe pears and large ones. This recipe is perfect for those stone-hard pears. Roasting the pears softens them up without making them mushy. The best ones for roasting  are Anjou, bosc or my personal favorite Bartlett. They all retain their shape and flavor when baked.

Gorgonzola the star ingredient in this recipe adds a creamy, tangy flavor. You can use regular or dolce (a milder, creamier version) or blue cheese is a good substitute.

The walnuts add crunch and a nutty flavor i chop them fine you can also leave some whole to place on top of the pears.

The honey adds sweetness to balance the gorgonzola,  maple syrup does the same thing.

A sprinkle of fresh thyme or rosemary adds a hint of earthy flavor that complements the pears and cheese.

Baked Gorgonzola Stuffed Pears

  • 4 pears
  • 1 cup gorgonzola
  • 1 cup chopped walnuts
  • 1 Tbsp. thyme
  • 4 Tbsp. honey
  1. Set your oven to 375-degrees

  2. Start by washing the pears and drying. Then cut in half and scoop out the seeds.
  3. Mix the gorgonzola, chopped walnuts, thyme and 2 Tbsp. of the honey.
  4. Fill the cavities of the pears with the filling. Roast in the preheated oven for 20 -30 minutes. Then drizzle the pear halves remaining honey .


Warm winter apple cake

Warm Winter Apple Cake

This post may contain affiliate links, that help support this blog. If you make a purchase through these links, I may earn a commission—at no cost to you. For more information read my disclosure policy.

This warm winter apple cake is a moist, easy and delicious dessert. The perfect sweet and spicy cake, with large chunks of sweet apples and chopped walnuts. Truthfully I had no plans of making an apple cake today, until I looked at my fruit bowl ….YIKES, another day or two the apples would have ended up in the compost pile. Every time I make this I wonder why I don’t make it more often, it’s one of my favorite cakes.

The smell from the apples and  spices while the cake is baking fill your home with the most cozy, comforting aroma.

I don’t know about you, but for me I like simple, easy desserts that taste delicious, come together in less than a hour, but has your friends thinking it took hours, this is one of those cakes. It’s  simple and so delicious you’ll want to make it often. This cake freezes well, for a ready make dessert and keeps fresh for a day or two covered on the counter

Things to know about this warm winter cake

Apples: Go for a firmer sweet variety. I used gravenstien honey crisp or gala apples work well in this recipe and offer a slightly tart contrast.

Olive oil: Use a good quality extra virgin olive oil. It will make all the difference.

Flour : the recipe calls for all purpose flour, you can use half whole wheat for a nuttier flavor. Or use gluten free and up the amount by 1/2 cup.

Glaze: You can top this winter apple cake with a wet glaze, or even a caramel glaze or keep it simple and just use a dusting of powder sugar.

If you make this apple cake please leave me a comment on your experience with this recipe. I love hearing from you. It’s my favorite part and it helps others too.

Warm Winter Apple Cake

  • 2 1/2 cups flour
  • 3 teaspoon baking powder
  • 1/2 teaspoon baking soda
  • 4 eggs
  • 1 1/2 cups sugar
  • 3/4 cup extra virgin olive oil
  • 3 cups un peeled apples cut in medium dice
  • 1 cup chopped walnuts
  • 2 teaspoon each (cinnamon, all spice, and vanilla)
  1. Heat oven to 350 degrees coat a 10 cup bundt pan with non sick cooking spray. Beat eggs, sugar, vanilla and oil until light2. Combine baking powder and spices with flour3. Add flour to liquid ingredients4, Mix until well blended5. Add apples and walnuts mix just until blendedBake in a 350 degree oven for 45 minutes or until a tooth pick comes out clean cool 20 minutes before running knife along pan to loosen the cake invert on a cake dishDrizzle cooled cake with a simple glace, for the glace: mix 2 cups of powder sugar with 2 tablespoons of milk and 1/2 teaspoon of cinnamon drizzle over cooled cake or dust with powder sugar


Italian Crostata jam tart

   Italian crostata Jam tart

Crostata  is an Italian jam tart ( know as crostata de marmellate in Italy) with a light pastry crust, jam or fruit filling and a lattice top. Marmellata means jam  in Italian , which is what crostatas are filled with. apricot, raspberry, cherry and my personal favorite strawberry. Crostate di marmellata  is one of the most popular homemade Italian desserts.  And something you will find in most Italian kitchens and all over cafes in Italy.

Things to know about This Italian crostata jam tart

Italian crostata jam tarts recipes ( crostata de marmellata in Italian) usually features a filling of homemade jam made from the season’s latest harvest. Since this is a recipe to make year-round and some of us don’t regularly made our own jam a good quality  store- bought jam works well.

Some crostata recipes use oil instead of butter for the crust. I have used both oil and butter and my preference is butter.

Traditionally crostatas have a plain unsugar top, I like to sprinkle the top lightly with powder sugar for a pretty effect. If you like easy desserts that come together quickly and use a few ingredients try one of my Bundt cakes mandarin Bundt cake or lemon blueberry ricotta Bundt cake.

Ingredients

  • 2  cups of flour more for the work surface
  • 2 tsp. baking powder
  • 1 cup of sugar
  • 1 stick of butter
  • 2 eggs
  • 1 Tbsp. vanilla
  • Juice and zest from one lemon
  • 2 cups of your favorite jam

Instructions

  1. Add the baking powder to the flour mix until well combined place on a work surface.
  2. Make a well in the center add the eggs, sugar, vanilla, lemon juice and zest,  beat with a fork or wisk until well blended. Then add the cubed cold butter. Using your hands in the shortest amount of time and as quickly as possible adding a little flour on the work surface to prevent the dough from sticking knead the pasta frolla  into a smooth soft ball. Wrap in elastic wrap and refrigerate for a least one hour or  overnight.
  3. After you have chilled the dough let it come to room temperature  for10 to 15 minutes. Preheat your oven to 375-degrees and grease a 8 inch tart pan with butter.
  4. Then cut the dough into 2 parts one into 1/3 for the the lattice top set aside.  Take the remaining 2/3 piece of Italian pastry dough and on a lightly floured work surface roll out the dough into 1/4 inch thick circle. Wrap the dough around the rolling pin and unwrap over the tart pan pressing into shape, cut off excess and add to the reserved dough. Roll out the reserved dough into a circle 1/4 inch thick cut into 10 equal size strips.
  5. Spread the pastry crust with the jam .  Lay 5 of the dough strips over the jam in a diagonal pattern. Lay the remaining 5 pieces in a diagonal patter in the opposite direction forming a diamond pattern.
  6.  Bake in a preheated oven for 35 to 40 minutes. let cool slightly before cutting. ENJOY!!!!


Apple cinnamon zeppole Fritters

  Apple cinnamon zeppole Fritters

These Easy Cinnamon Apple zeppole Fritters are luscious deep fried donuts filled with apples,  full of cinnamon flavor and covered in sugary goodness or a simple glaze.

You can have these delicious warm fritters in your hands in less than 30 minutes. Be sure to stash some for yourself before setting them out they disappear really quick.

I love apple recipes, but honestly who doesn’t? After all with so many different varieties I like to use them in sweet and savory recipes.

What variety of apple you use doesn’t  matter much. unless you prefer one variety over another. In this Easy Cinnamon Apple zeppole Fritter recipe I used what I had 1 Gala and 2 golden delicious.

3 Tips When Making   Apple zeppole Fritters

The first tip when making these Easy Cinnamon Apple zeppole Fritters is the oil you use. Canola oil is the best oil for frying because of it’s high smoke point, neutral flavor and high value.

Second. the oil temperature needs to be between 360 and 375 degrees for the fritters to cook all the way through keeping them crispy on the outside and fluffy on the inside.  It’s a good idea to invest in a food thermometer or a counter top electric fryer!!!

Third, These Easy Cinnamon Apple Fritters with a generous amount of sugar with still warm or make a simple glaze by mixing 1 cup of powered sugar with 1 tsp.  vanilla and 1 Tbs. of water to drizzle over the fritters.

And lastly please leave me a comment if you make these easy Apple fritter recipe and please don’t forget to tag me on Instagram with your creations. I love hearing from you!!!!

Ingredients

  • 2 cups canola oil for frying
  • 3 apples peeled and cut in small dice
  • 1 cup flour
  • 1/2 cup sugar
  • 1 Tbs. cornstarch
  • 1 tsp. baking powder
  • 1 Tbs. cinnamon
  • 1 tsp. cloves
  • 1 Tbs. vanilla
  • 2 eggs separated
  • 1 Tbs. lemon juice
  • 1/4 cup milk
  • 2 Tbs. melted butter

Instructions

  1. Chop  the pitted unpeeled apples into small pieces add the juice from one lemon. 1 tsp. of cinnamon and 1 Tbsp. of sugar . Set aside while you make the batter
  2. In a large saute pan bring the oil to 350 degrees over moderate heat
  3. Mix the flour. baking powder, cinnamon and cloves
  4. In a clean bowl  beat the egg whites with a pinch of salt until stiff set aside in a separate bowl  beat the egg yolks with the sugar until light and fluffy then mix in the milk, vanilla and melted butter
  5. Slowly wisk flour mixture into the egg mixture
  6. Mix in the apples
  7. Fold in the egg whites
  8. Drop by heaping Tablespoons into hot oil being sure the oil is hot and not do overcrowd the pan
  9. Fry 4 to 5 minutes per side or until golden brown
  10. Drain on paper towels sprinkle generously with powder sugar will warm. ENJOY!!!