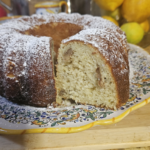
Pureed apple walnut Bundt cake

Pureed apple walnut Bundt cake

This post may contain affiliate links, that help support this blog. If you make a purchase through these links, I may earn a commission—at no cost to you. For more information read my disclosure policy.

Truthfully I had no plans of making an apple cake today, until I looked at my fruit bowl ….YIKES, another day or two the apples would have ended up in the compost pile. Every time I make this Pureed apple walnut cake I wonder why I don’t make it more often, it’s one of my favorite cakes. The smell from the apples and  spices while the cake is baking fill your home with the most cozy, comforting aroma.

If you like layer cakes you can use two 9 inch cake pans,  and make a butter, cream cheese frosting to spread between the layers. I used a 9 cup  bundt pan.  AS  much as I like layer cakes I like simple better, so most of my cakes are single layer. Single layer cakes are less labor intense than multiple  layer cakes, I don’t know about you, but for me I like simple, easy desserts that taste delicious, come together in less than a hour, but has your friends thinking it took hours, this is one of those cakes. It’s  simple and so delicious you’ll want to make it often. This cake freezes well, for a ready make dessert and keeps fresh for a day or two covered on the counter.

Things to know about this Pureed apple walnut Bundt cake

This cake uses fresh, raw pureed apples—not applesauce or cooked fruiThe raw apple puree gives the cake a bright, natural apple flavor and keeps it incredibly moist and tender.

It’s a great way to use crisp apples that are slightly past their prime for eating but still full of flavor.

Chopped walnuts are folded into the batter for a pleasant crunch and nutty depth.

They pair beautifully with the light fruitiness of the apples.

The raw apples add moisture without making the cake too sweet or dense.

It has a light, balanced flavor that works well for dessert, snacking, or even breakfast.

The Bundt pan gives it a classic, elegant shape—perfect for slicing and serving. Just be sure to generously grease and flour the pan so the cake releases easily. This isn’t a fall cake—it’s great year-round.

Serve plain, dust with powdered sugar, or finish with a light citrus glaze or honey drizzle for a warm-weather feel.

It’s casual enough for everyday baking but special enough to bring to a gatherings. ENJOY!!! If you like Bundt cakes as much as I do try my Mandarin orange Bundt cake or my personal favorite lemon Ciambellone Bundt cake 


Pureed apple walnut Bundt cake

  • 2 1/2 cups flour
  • 3 teaspoon baking powder
  • 1/2 teaspoon baking soda
  • 3 eggs
  • 1 1/2 cups sugar
  • 1 cup plain Greek yogurt
  • 1/2 cup light olive oil
  • 1 1/2 cups 2 medium apples unpeeled cored apples cut in medium dice and pureed in a blender. Of course you have the option to peel the apples. Honey crisp ,pink lady or fuji apples or a combination of all ,are good choices.
  • 1 cup chopped walnuts
  • 2 teaspoon each (cinnamon, all spice, and vanilla)
  • Powder sugar for dusting or glazing
  1. preheat your oven to 350 degrees

  2. spray a 9 inch Bundt pan with cooking spray to prevent sticking
  3. Beat eggs, sugar, yogurt, oil and vanilla, until light( 2- 3 minutes minutes)
  4. Combine baking powder, baking soda and spices with the flour. Add the flour mixture to the egg mixture Mix only until well blended
  5. Add the apples and walnuts mix just until well blended
  6. Bake in a 350 degree oven for 35-40 minutes or until a tooth pick comes out clean
  7. Cool 20 minutes before running knife along pan to loosen the cake invert on a cake dish. Drizzle cooled cake with a simple glace, or powder sugar
  8. for a glace option: mix 2 cups powder sugar with 2 tablespoons of milk and 1/2 teaspoon of cinnamon drizzle over cooled cake





Easy lemon tiramisu  with lemon curd

Easy Lemon Tiramisu  with Lemon Curd

This post may contain affiliate links, that help support this blog. If you make a purchase through these links, I may earn a commission—at no cost to you. For more information read my disclosure policy.

Introducing easy lemon tiramisu with lemon curd. The most delicious twist on a classic Italian dessert. The layers of mascarpone cream and lemon curd is the prefect balance between tangy and sweet.  Now that the weather is warming up bring on the lemon! Instead of the chocolate and coffee, this recipe is made with layers of zesty mascarpone cream, lemon curd and ladyfingers dipped in a simple lemon syrup, for a bright, delicious fresh taste.

Things to know about  this Easy lemon tiramisu  with lemon curd recipe

  1. It’s light and tangy: Unlike traditional coffee and chocolate tiramisu, this lemon version is bright and citrusy, perfect for spring and summer.
  2. No baking : There is no baking perfect when you want something sweet without turning on the oven.
  3. Make ahead friendly; I love anything that can be make ahead of time. Lemon tiramisu actually taste better after chilling for several hours or overnight.
  4.  Make it easier: You can use store- bought lemon curd to save time. But homemade lemon curd is really easy to make and adds an extra special touch. And it can be made up to 3 days ahead of time.
  5. You can freeze lemon tiramisu, but it taste best fresh. If you do freeze it wrap it tightly.
  6.  Mascarpone cheese is ideal for tiramisu because of it’s rich creamy texture. If you can’t find it , you can substitute full-fat cream cheese softened with a little heavy cream. If you love lemon desserts try these other easy recipes. Lemon ricotta cookies or my Italian lemon knot cookies 
  7. If you make this easy lemon tiramisu , please leave me a comment on your experience with this recipe. I love hearing from you , and it helps others.


Easy Lemon Tiramisu with Lemon Curd

Easy Lemon Tiramisu combines delicate ladyfingers, creamy mascarpone, and bright lemon curd for a refreshing twist on classic Italian tiramisu. Light, creamy, and bursting with fresh lemon flavor, it’s an elegant make-ahead dessert.

For the Lemon Cream

  • 2 cups heavy cream
  • 1 cups mascarpone cheese
  • 1 /2 cup powder sugar
  • 1 cup lemon curd
  • 24 lady fingers

For the Lemon Curd

  • 3 eggs
  • 1/2 cup granulated sugar
  • 1/2 cup lemon juice
  • 1/2 stick butter cut into pieces

For the Simple Syrup

  • 1 cup fresh lemon juice
  • 1/2 cup water
  • 1/2 cup sugar

Make the Simple Syrup

  1. In a small pan add the lemon juice, water and sugar simmer until the sugar dissolves. ( 2- 3 minutes) Let cool

Make the Lemon Cream

  1. In a bowl, whip the cold cream until stiff peaks form. In another bowl mix the mascarpone cheese, powder sugar and 1 cup of lemon curd until smooth.
  2. Gently fold the whipped cream into the mascarpone – lemon curd until well combined. Be careful not to deflate the cream

Make the Lemon Curd

  1. In a small sauce pan over wisk the eggs, lemon juice, zest, sugar until smooth
  2. Place the pan over medium low heat and cook stirring continuously , making sure to scrap down the sides.
  3. Continue cooking until the lemon curd mixture thickens enough to coat the back of a spoon 4-5 minutes.DO NOT LET IT BOIL, reduce the heat if you need to.
  4. Take it off the heat and immediately whisk in the butter, a piece at a time, until fully melted and the curd is silky. Let cool before adding the mascarpone cream.

Assemble the Tiramisu

  1. Quickly dip each lady finger into the lemon simple syrup. Don’t soak them it’s just a quick dip. They should be moist not soggy.
  2. Arrange a layer of dipped lady fingers in the bottom of a 9 x9 inch casserole dish .
  3. Spread half of the lemon cream over the lady fingers. Repeat with another layer of dipped ladyfingers, then the remaining lemon cream.
  4. Top with the remaining lemon curd.
  5. Cover and refrigerate for at least 4 hours or preferably overnight.
  6. Garnish with lemon zest and a dusting of powder sugar if desired.
Dessert
Italian
lemon tiramisu, easy


Italian spinach pie Torta Pasqualina

Italian Spinach Pie Torta Pasqualina


This post may contain affiliate links, that help support this blog. If you make a purchase through these links, I may earn a commission—at no cost to you. For more information read my disclosure policy.

This delicious Italian spinach pie  torta Pasqualina is made with pastry dough, spinach, or other greens like swiss chard or artichokes, ricotta cheese and eggs. Traditionally, torta Pasqualina was made with Swiss chard. This leafy green was abundant in Italy during the spring and  symbolized the season’s renewal.

Over time , as the dish made it’s way into Italian- American kitchens, the recipe evolved. spinach became a popular substitute- it’s easier to find, milder in flavor, and cooks down perfectly into the creamy filling. Today , both greens are widely used, and many home cooks use what’s seasonal or convenient. You can mix swiss chard and spinach for the best of both greens. Despite the changes the basis of torta Pasqualina remains the same, a flaky pie filled with greens, ricotta and those signature whole eggs inside, symbolizing life and a celebration of renewal.

Make Italian spinach pie Torta Pasqualina easy

To make this classic Italian spinach pie more approachable for busy or beginner cooks, you can (like I did) use store-bought pie crust or puff pastry.  The original version used an olive oil dough  and had 33 layers of dough, symbolizing the 33 years of Christ’s life. In today’s home kitchens, you can still honor the spirit of the tradition without all the layers.

Simply roll out the a refrigerated pie crust into a pie pan or spring from pan and press it gently to fit. Add your creamy filling, then crack in your whole eggs, just like the traditional method. You can choose how many eggs to add based on the size of your pie and your preference- some use two , others like me go for four or five. Top with the second  crust, crimp the edges and bake until golden. Using ready-made crust gives you a buttery, flaky texture with minimal fuss- perfect for Easter brunch or weekday prep.

Whether you’re honoring a family tradition or starting a new one, this Italian spinach and ricotta pie brings a slice of Italy to your table. And with the help of a store-bought crust, you can enjoy all  the flavors of Torta Pasqualina- without spending all day in the kitchen. Simple, delicious and full of history, it’s a recipe that brings me back to my childhood.

If you like traditional Italian Holiday recipes try my rosemary garlic seared lambchops or Italian  Easter rice pie or Italian boneless leg of lamb roast 

Italian Spinach Pie Torta Pasqualina

Torta Pasqualina is a traditional Italian savory pie made with tender spinach, creamy ricotta, Parmesan cheese, and eggs baked inside layers of delicate pastry. A classic Ligurian recipe traditionally served at Easter, this rustic Italian pie is delicious warm or at room temperature.

  • 2 Tbsp. olive oil
  • 1/2 cup chopped onion
  • 1 Tbsp. minced garlic
  • 1 1/2 lbs. fresh spinach or swiss chard
  • 2 cups ricotta
  • 1/2 cup grated parmesan cheese
  • pinch of nutmeg
  • 2 Tbsp. chopped Italian parsley
  • 7 eggs 3 mixed into the filling and 4 or more cracked whole into the pie
  • 2 pie crust store bought
  • egg wash for brushing the crust
  • salt and pepper to taste
  1. Sauté the onion and garlic in the 2 Tbsp. of olive oil until soft and translucent, then add the spinach and cook for just a few minutes until wilted. Let cool slightly. Then use your hands to squeeze out as much of the liquid as possible and chop.

  2. In a bowl, mix the add three of the eggs and whisk slightly, add in the ricotta, parmesan, spinach, parsley, nutmeg, salt and pepper to taste
  3. Line a lightly greased pie dish or 8 inch spring form pan with one of the pie crust, fill with the spinach mixture.
  4. Make 4-5 small indentations in the filling using the back of a spoon and crack one egg into each one- don’t stir. These will bake whole inside the pie
  5. Cover with second crust, seal the edges, and cut a few small slits on the top. brush with egg wash .
  6. , Bake in a 375 degree preheated oven for 45-55 minutes, or until golden brown and the filling is set
  7. Let cool slightly before slicing.
Appetizer, Main Course, Side Dish
Italian
Torta Pasqualina, Italian spinach pie,


Italian Easter Rice pie

Italian Easter Rice Pie

This post may contain affiliate links, that help support this blog. If you make a purchase through these links, I may earn a commission—at no cost to you. For more information read my disclosure policy.


Italian Easter Rice Pie, known as Torta di Riso di Pasqua, is a classic Italian dessert traditionally served during the Easter season. This rustic sweet pie combines creamy Arborio rice, ricotta cheese, eggs, and sugar, with a touch of citrus for bright, delicate flavor. Baked in a buttery crust until golden, the filling sets into a rich, creamy, custard-like texture that is lightly sweetened and wonderfully satisfying.

Traditionally prepared on Holy Saturday, Torta di Riso di Pasqua is a wonderful example of Italian cucina povera, using simple pantry staples such as rice, milk, cheese, and eggs to create something special. The pie is often chilled overnight and served on Easter Sunday, either as a simple breakfast alongside coffee or as a sweet ending to the Easter meal.

Make this Italian Easter rice pie recipe manageable.

Italian Easter Rice Pie does take a little more time to prepare than some of my other desserts, but it is well worth the extra effort. You’ll need to prepare the crust, cook the Arborio rice, and make the ricotta filling before assembling the pie. There are a few steps, but each one is simple.

To make things easier, you can prepare the crust and cook the rice a day ahead. When you’re ready to assemble the pie, the filling comes together quickly. I recommend making this pie the day before you plan to serve it so it has plenty of time to cool and set.

This is a traditional Italian Easter dessert that takes a little patience, but there’s nothing complicated about it. Give yourself enough time, follow the steps, and you’ll have a beautiful homemade rice pie to serve for Easter.

If your looking for more Easter Recipes try My rosemary garlic seared lambchops or my delicious spaghetti pie or for a delicious Easter breakfast treat try my easy crepe recipe.  

Italian Easter Rice Pie

Italian Easter Rice Pie, or Torta di Riso di Pasqua, is a traditional Italian Easter dessert made with creamy Arborio rice, ricotta cheese, eggs, sugar, and citrus baked in a buttery crust. The filling has a rich, custard-like texture with a delicate sweetness, making this classic Italian pie a beautiful dessert for Easter.

For the pasta frolla ( pastry dough)

  • 3 1/2 cups of flour
  • 1 cup sugar
  • 2 teaspoon baking powder
  • 2 eggs + 2 egg yolks
  • 1/2 stick room temperature butter
  • zest and juice from one lemon

For the Filling

  • 1 cup arborio rice
  • 3 cups milk
  • 1 lemon and 1 piece orange peel
  • 2 Tbsp. butter
  • 2 cups ricotta
  • 3 eggs
  • 1 cup sugar
  • 1/2 cup candied citron or candied lemon peel
  • 1/2 teaspoon cinnamon
  • 2 teaspoon vanilla extract
  • powder sugar for dusting

Make The Pasta Frolla (the pastry dough)

  1. In a food processer add the flour, sugar, and baking powder. Pulse until well combined.

  2. Add the eggs, egg yolks, and butter and pulse until , large moist crumbs start to form (1-2 minutes)
  3. Remove dough from the food processer onto a smooth surface. And with your hands knead the dough gently into a smooth ball. Wrap in plastic wrap and refrigerate for at least one hour .

Make the Filling

  1. Add the rice, orange peel, vanilla and cinnamon to the milk. Simmer over medium high heat for 30 minutes, stirring often to keep the mixture from sticking to the pan, cook until the rice is cooked and most of the milk as been absorbed. Remove the orange peel. Add the butter to the rice and cook for an additional 5 minutes. Then spread out on a baking tray and let cool.
  2. If the ricotta has a lot of liquid in it , drain it in a colander
  3. In a large bowl , beat the ricotta with the sugar until light, then add the eggs one at a time beating until well combined after each addition. Then add the orange extract and mix until well combined.
  4. Once the rice has cooled completely, add it to the ricotta mixture slowly a few spoons at a time. Mix with a wooden spoon until the rice is fully incorporated into the filling. Set aside
  5. Preheat your oven to 350 degrees. Grease a 8 inch springform pan or pie pan.
  6. On a lightly floured surface cut the dough in half roll out one half of the dough to about 1/2 inch thick. Transfer to the prepared pan, and cut off any hanging edges. fill with the filling.
  7. Roll out the remaining dough to 1/2 inch thickness and cut into 10 about 6 inch long strips, make a lattice pattern with the dough strips.
  8. Bake the Pie for 50-60 minutes, or until the edges are golden. Let the pie cool then dust with powder sugar.
Appetizer, Main Course, Side Dish
Italian
Torta di Riso di Pasqua, Italian Easter


Classic Italian taralli Dolce

Classic Italian Taralli Dolce

This post may contain affiliate links, that help support this blog. If you make a purchase through these links, I may earn a commission—at no cost to you. For more information read my disclosure policy.

This classic Italian taralli dolce recipe yields a lightly sweet, unleavened biscotti with a crispy texture achieved through first boiling the taralli and then baking the ring shaped dough right on the oven grates. Growing up in an off the boat Italian family Taralli sweet or salty have always been a part of my favorite snacks.  Some may say I have a taralli obsession, I have to agree. If this is any indication of my obsession I have made these taralli dolce three times in the last two weeks and each time I ended up eating them before they were glazed. They are additive .

If your unfamiliar with taralli, think ring- shaped fat bread sticks, usually make during Easter.  You can enjoy them in a variety of flavors. my favorites are taralli Dolce and on the salty savory side taralli with fennel. This is my family recipe a simple yeast- free taralli my mother would make something she would ice them and top them with colorful sprinkles.

Things to know about this Classic Italian Taralli Dolce recipe

Taralli are typically made with the most basic ingredients, such as flour, water, olive oil and either salt or sugar. Sometimes additional ingredients are added like fennel seeds, black pepper, or red pepper flakes. Here are some variations.

Add a generous pinch of red pepper flakes to the dough for spicy tartalli.

For the most classic flavored  fennel tarelli  (I have linked the recipe)and my personal favorite  omit the sugar, vanilla and add 1 tablespoon of salt and 3-4 tablespoons of fennel to the dough.

Omit the sugar and add 1 Tablespoon of salt and 2-3 Tablespoons of finely minced rosemary.

In certain parts of Italy , taralli are a hugely popular local food. Locals love making them at home or grabbing some from nearby bakeries.

Making Classic Italian taralli  dolce at home is easy and so much fun to make!!Best of all, you don’t need any special equipment, fancy ingredients or cooking skills. follow the simple steps and before you know it, you will be making Classic Italian Tarali dolce without referring to the recipe.

If you make these Taralli Dolce please leave a comment about your experience with the recipe. And please tag me on Instagram with your creations. I love hearing from you , and it helps others. 

Classic Italian Taralli Dolce

Classic Italian Taralli Dolce are traditional Italian sweet biscuits with a tender, lightly crisp texture and delicate sweetness. These rustic ring-shaped cookies are made with a simple dough and are often finished with a sweet glaze, making them a wonderful Italian treat to enjoy with coffee or tea and a favorite for holidays and family celebrations.

  • 3 cups all-purpose flour
  • 4 eggs
  • 1 cup sugar
  • 1/2 cup olive oil
  • 1/3 cup marsala wine
  • Juice and zest from one lemon
  • 1 Tbsp. Vanilla
  • 4 cups water for boiling + 1lemon
  1. Start by beating the eggs and sugar until light and fluffy and double in volume about five minutes.

  2. Add the liquid ingredients oil, wine, lemon juice and zest continue beating until well combined.
  3. Add the flour a little at a time mix until combined, when the dough becomes to hard for the mixer transfer to a lightly floured surface, knead the dough until smooth ( about 5 minutes). Cover and let rest 10 minutes
  4. Fill a deep pan with water add a sliced lemon bring to a low boil.
  5. Preheat your oven to 400 degrees
  6. Cut the dough into 12 equal pieces roll into ropes about 10 inches long and form into circles pinch the ends tightly to seal.
  7. Add a sliced lemon to the water. Boil in lightly boiling water in batches. Immediately use a spoon to unstick the taralli from the bottom of the pot. Boil until they come to the surface ( about 5 minutes). Let dry on a tea towel.
  8. Bake directly on the oven grates at 400 degrees for 10 minutes. Lower the heat to 325 degrees and continue baking an additional 30 minutes. Let cool slightly before glazing with a loose mixture of powder sugar and lemon juice.

Dessert
Italian
Italian taralli dolce,


Lemon Italian Sponge Cake, Pan di Spagna

Lemon Italian Sponge Cake

This post may contain affiliate links, that help support this blog. If you make a purchase through these links, I may earn a commission—at no cost to you. For more information read my disclosure policy.

The Italian name for this classic Lemon Italian sponge cake is Pan Di Spagna, meaning bread of sponge. What ever you call it after you try it you’ll call it delicious.

In my Italian upbringing this was the cake my Mom make often.

If the sponge cake was for a special occasion a birthday, a birth or a bridal shower the cake was fancied up with a variety of different fillings, frosted and decorated according to season or celebration.

Most often a simply syrup of some rum or  alcohol was poured over the cake while  still warm. Other times, it was a simple one layer sponge cake doused with a sugary lemony simple syrup. In this lemon Italian sponge cake recipe there is no alcohol or simple lemon syrup. Honestly I simply forgot this step, although the cake was delicious anyway.

For the simple lemon syrup boil 1/2 cup sugar with 1/4 cup lemon juice until the sugar is dissolved and the liquid has a syrupy continence about 5 minutes then pour over the warm cake layers,

3 ways to Make this lemon Italian Sponge cake Easy

Want to make this Italian sponge more easy??  One way You can do that is by using vanilla pudding for the lemon cream filling. Here’s how: follow the package directions on the package for the vanilla pudding substitute 1/4 of the milk with freshly squeezed lemon juice, it’s that easy.

The second way you can speed things up, when you make this  lemon sponge cake instead of the whipped cream frosting you can use whipped topping, although the whipped cream version is sure easy to make.

And third this Lemon Italian Sponge Cake  may sound and look intimidating, but it’s not. This sponge cake can be made in steps, the cake and  filling can be make the day before, then assembled and frosted the day you plan to serve it.

One more thing, be sure to use the right size cake pan. I can’t tell you how many times I’ve ruined food by using the wrong size pan. 

Lemon Italian Sponge Cake

This light and delicate Lemon Italian Sponge Cake is infused with fresh lemon flavor and has a soft, airy texture. Simple ingredients come together to create a classic Italian-style cake that's perfect with coffee, tea, or as an easy dessert for any occasion.

FOR THE CAKE

  • 6 eggs
  • 1 1/3 cups sugar
  • 1 1/2 cups flour
  • 4 teaspoons baking powder
  • 1 Tbsp. vanilla extract
  • Juice and zest from 1 lemon

FOR THE LEMON FILLING

  • 2 cups milk
  • rind and juice from 1 lemon
  • 1 egg + 2egg yolks
  • 1/2 cup of sugar
  • 2 Tbsp. cornstarch
  • 2 Tbsp. butter
  1. Pre heat oven to 350 degrees

  2. Grease 2 eight inch cake pans
  3. Beat eggs and sugar until light and double in volume about 5 minutes
  4. Add the lemon juice, zest and vanilla. Mix until well combined
  5. Blend flour and baking powder together
  6. Mix flour mixture into egg batter
  7. Divide batter among the two cake pans
  8. Bake for 30 minutes or until an inserted toothpick comes out clean. Make the lemon cream. 1. In a saucepan over medium heat combine the milk and lemon peel. When the milk starts to steam remove from the heat ( do not allow milk to come to a boil) 2. Wisk the eggs with sugar until well combined ( about 1-2 minutes). 3. Add the corn starch to the egg mixture. 4. Wisk continuously until the egg mixture becomes light. ( about 5 minutes). 5. Remove the lemon peel from the milk. 6. Add a ladle of the hot milk to the egg mixture while whisking continuously. Gradually add all the hot milk while stirring. Transfer the mixture back to the saucepan and over medium heat, wisk for 5 minutes or until the cream thickens. remove from the heat let cool slightly before adding the butter and lemon juice whisk until well combined. Cover with plastic wrap . Let cool completely.
  9. When the cake is still warm you can pour rum or a simple syrup over the layers. (optional)
  10. layer with the lemon cream
  11. Frost with stabilized whipped cream
  12. For the stabilized whip cream frosting mix 1 tsp plain gelatin with 1 Tbls. water In a mixing beat 2 cups of heavy whipping cream until soft peaks form then slowly add 1/2 cup powdered sugar, the gelatin and 1 Tbls vanilla
  13. Decorate with pistachios and sliced berries.
cake, Dessert
Italian
Lemon Italian sponge cake


Mandarin orange Bundt cake

Mandarin Orange Bundt Cake

This post may contain affiliate links, that help support this blog. If you make a purchase through these links, I may earn a commission—at no cost to you. For more information read my disclosure policy.

This recipe is all about the sweet and tangy goodness of mandarin orange bundt cake, a delicious cake full of citrus flavors. The addition of ricotta gives the cake an incredibly moist crumb, making each bite irresistibly rich and luscious.

Right now , citrus is really prolific in California, filling markets and backyards with an abundance of vibrant oranges, lemons and mandarins. There’s something special about baking with fresh, seasonal fruit at it’s peak- every bite bursts with natural sweetness and a hint of sunshine. If you have access to locally grown mandarin , this cake is the perfect way to showcase their bright, zesty flavors.

Mandarin orange bundt cake has a  timeless appeal, reminiscent of simple homemade cakes  baked with love in family kitchens. The citrus flavor not only brighten up the cake but also bring a delicious flavor when combined with vanilla. Whether you remember a version of this cake from childhood or discovering it for the first time, it’s appeal is undeniable.

Variations for this mandarin Orange bundt cake recipe

One of the joys of baking is making a recipe truly yours. For an extra burst of texture and flavor, consider adding finely chopped nuts, shredded coconut or a hint of spice like cinnamon. Want a more citrus taste? A combination of mandarin and a touch of orange zest will enhance the flavor. The ricotta already makes this cake exceptionally rich and  moist, but if you want more richness, a touch of honey or a mandarin glaze instead of powder sugar will take the cake next level.

A mandarin orange bundt cake is a simple yet stunning way to embrace the natural deliciousness and beauty of citrus. It’s proof that sometimes, the most unassuming ingredients come together to create something delicious. Whether served as a breakfast treat, an afternoon snack or after dinner treat, this cake is bound to brighten any day!!! So go ahead, bake up a little sunshine and let the sweet smell of mandarin oranges and creamy ricotta fill your kitchen. 

Mandarin Orange Bundt Cake

This moist and tender Mandarin Orange Bundt Cake is bursting with bright citrus flavor and made with juicy mandarin oranges for a simple, delicious dessert that's perfect for everyday baking or special occasions.

  • 4 eggs
  • 1 1/2 cups sugar
  • 3/4 cup light olive oil
  • 1 cup ricotta cheese
  • 2 Teaspoon vanilla
  • 2 mandarin oranges peeled, seeded and pureed
  • 2 cups flour
  • 1 Tbsp. baking powder
  • Powder sugar for serving
  1. Set your oven to 350- degrees. Grease a 9.5 inch Bundt pan

  2. Prepare the mandarins by peeling, seeding and pureeing. Set aside.
  3. In a bowl beat the eggs with the sugar until light and fluffy 2-3 minutes. Add in the ricotta and beat 1 minute longer.
  4. Add in the oil, pureed mandarin, and vanilla and mix until well combined.
  5. Mix the baking powder with the flour. Slowly add the flour mixture to the egg mixture. Mix only until well combined.
  6. Pour the cake batter into the prepared Bundt pan. Bake in the preheated oven for 40-45 minutes or until an inserted toothpick comes out clean

  7. Let cool slightly before removing from the pan. Cool completely before dusting with powder sugar.
cake, Dessert
Italian
mandarin orange bundt cake,


Classic strawberry cheesecake

Classic Strawberry  Cheesecake

This post may contain affiliate links, that help support this blog. If you make a purchase through these links, I may earn a commission—at no cost to you. For more information read my disclosure policy.

Get ready to enjoy a slice of cheesecake heaven with this classic  strawberry cheese cake. This indulgent treat combines a velvety cream cheese filling, buttery cookie cracker crust  and a luscious homemade strawberry topping. It’s the ultimate dessert for any occasion-birthdays, dinner  parties or just because you deserve it.

This cheesecake is my husband’s favorite dessert. Every year on his birthday I make this classic strawberry cheesecake just for him, complete with the fresh strawberry topping he likes the most. It’s become a sweet tradition in our family, and seeing him enjoy a slice makes the occasion even more special.

Tips for success when making classic strawberry cheesecake

Use room temperature ingredients to achieve a creamy filling, make sure your cream cheese , eggs, cream and mascarpone are at room temperature before mixing. Cold ingredients can lead to a lumpy batter and uneven texture,

I am using a cookie base for the crust you can use ready made graham cracker crumbs and just mix in the butter and sugar.

Bake the cheesecake in a water bath to prevent cracks. Wrap the outside of your springform pan tightly with foil to keep water out, place it in a larger pan , and add hot water until it reaches halfway up the sides. The steam creates a gentle , even heat for perfectly smooth cheese cake.

Resist the urge to dig in right away! allow the cheese cake to chill in the refrigerator  overnight. This gives the filling time to set up and the flavors to develop, resulting in a firm yet creamy texture that slices beautifully. With this tips  your classic strawberry cheesecake will turn out beautiful and delicious. 

Classic Strawberry Cheesecake

This Classic Strawberry Cheesecake is rich, creamy, and perfectly balanced with a buttery graham cracker crust and a sweet strawberry topping. It’s an elegant yet approachable dessert that’s perfect for holidays, celebrations, or whenever fresh strawberries are in season.

FOR THE CRUST

  • 2 cups graham cracker crumbs
  • 1/3 cup sugar
  • 1 stick melted butter

FOR THE FILLING

  • 1 lb. cream cheese (2 blocks)
  • 1 cups heavy cream
  • 1 cup mascarpone cheese
  • 3 eggs
  • 1 cup sugar
  • 2 tbsp. vanilla
  • 2 Tbsp. flour

FOR THE STRAWBERRY TOPPING

  • 2 cups cleaned and hulled strawberries sliced
  • 1/2 cup sugar
  • 2 Tbsp. water
  • 2 Tbsp. cornstarch
  • 1 tbsp. lemon juice
  1. Preheat your oven to 350- degrees

  2. Start by preparing the crust In a food processor add the graham crackers, butter and sugar . pulse until it looks like wet sand.
  3. Press the mixture firmly into the bottom and a little up the sides of a 9 inch springform pan. Bake for 10 minutes, while you prepare the filling

MAKE THE FILLING

  1. In a large bowl beat the softened cream cheese with the sugar beat until smooth , about 2-3 minutes
  2. Mix in the cream, mascarpone and vanilla mix until well combined. Add the eggs one at a time on low speed. Mix in the flour.
  3. Pour the filling into the prepared crust, smooth the top with a spatula. Place the springform pan in a water bath to prevent cracks. Wrap the spring form pan with tin foil and place in a larger pan. Fill the pan half way up with hot water .
  4. Bake for 55-65 minutes. Or until the edges are firm and the center still jiggly.
  5. Turn off the oven and leave the cheesecake inside with the oven door slightly opened for 1 hour.
  6. Remove from the oven and let cool completely. Cover and refrigerate without the topping for at least 3 hours or overnight for the best flavor and texture. TOP when you are ready to serve.

MAKE THE STRAWBERRY TOPPING

  1. In a small sauce pan add the prepared strawberries , sugar and water mix to combine. cook the mixture over medium heat stirring , until the strawberries release their juices. Thicken the glaze by mixing the cornstarch with 2 tbsp. of water to make a slurry. Add this to the sauce pan and stir well. Cook for another 3-4 minutes until the glaze thickens. Mix in the lemon juice.

For a smooth, creamy cheesecake, make sure your cream cheese and eggs are at room temperature before mixing. Avoid overmixing once the eggs are added, and let the cheesecake cool gradually before refrigerating to help prevent cracks.

Dessert
Mediterranean
homemade strawberry cheesecake


Authentic Italian Christmas Struffoli

Authentic Italian Christmas Struffoli

This post may contain affiliate links, that help support this blog. If you make a purchase through these links, I may earn a commission—at no cost to you. For more information read my disclosure policy.

Authentic Italian Christmas Struffolli, also know as honey balls, is an Italian Christmas dessert  that  brings up  cherished  holiday family memories for me and many Italian families. These golden , bite size balls of sweet dough are a hallmark of traditional  Italian celebrations. deep- fried to perfection, they are crispy on the outside, soft and chewy on the inside. Once fried they are generously coated with a warm honey, sugar creating a sweet glaze that holds them together in a mound or wreath shape.

Colorful sprinkles and sliced almonds  turn this simple treat into a festive centerpiece for your holiday dessert table. Each bite offers a satisfying crunch followed by the sweetness of the honey, making it impossible to eat just one.

Tips for success when making Authentic Italian Christmas struffoli

  1. Uniform size dough balls: Roll the dough into evenly sized balls, about the size of a marble. This ensures they fry evenly, resulting in a consistent texture.
  2. Maintain the right oil temperature: heat the oil to 350-degree F and monitor the temperature throughout frying. If the oil is too hot the struffoli will brown too quickly and remain undercooked on the inside. Too cool, and they will absorb excess oil becoming greasy instead of light and crispy.
  3. Work quickly with warm honey: Coat the fried balls  in the honey while still warm, This helps the honey to stick evenly and creates a glossy coating. Stir gently to cover all the dough balls with honey, add the sprinkles and almonds before the honey sets. This Authentic Italian Christmas stuffolli is more than just a dessert- it’s a celebration of tradition and family. By following these simple tips ,you will create a delicious centerpiece for your holiday table. Whether enjoyed with a cup of coffee or as part of a Christmas spread, stuffolli brings Italy to the season.

    Storage

    Store struffoli in an airtight container at room temperature for up to 3 days. Keep them covered so they don’t dry out. For the best texture, I recommend serving them within the first couple of days.

    CTA / Internal Links

    If you love traditional Italian Christmas desserts, try some of my other holiday favorites:


Authentic Italian Struffoli Recipe (Christmas Honey Balls)

Authentic Italian Struffoli are small, golden balls of fried dough tossed in warm honey and decorated with colorful sprinkles. This traditional Italian Christmas dessert is festive, delicious, and a favorite for holiday gatherings.

  • 3 cups flour
  • 1/2 cup sugar
  • 1 1/2 teaspoon baking powder
  • Zest for one lemon and one orange
  • 1/2 cup melted butter
  • 3 eggs
  • 1/3 cup white wine
  • 2 cups honey
  • 1/2 cup sugar
  • sprinkles
  • sliced almonds
  1. In a bowl blend the flour, baking powder, sugar, lemon and orange zest and blend well.

  2. Make a well in the center of the flour mixture, add the eggs, butter and wine gather the flour mixture towards the center forming a ball . Then, on a lightly floured broad knead the dough until smooth. Wrap and let the dough rest in the refrigerator for at lest 30 minutes.
  3. Then flatten the dough and cut into strips roll into a rope then cut into small even dice roll into balls.
  4. Bring the oil to medium high heat fry the dough balls in batches until golden brown about 4-5 minutes. remove and drain on paper towels.
  5. To a large saute pan add the honey and sugar, Cook on low until the sugar melts.
  6. Then add the fried dough to the honey mixture. Stir to coat all the dough balls.
  7. Place a small glass in the center of a large dish. Add the honey balls in a circular pattern forming a wreath. Top with sprinkles and the sliced almonds. I tied some cooking twine into a bow, used cranberries and rosemary sprigs to add a festive touch.

Keep the dough balls small and fry them in batches so they cook evenly and become light and golden. Toss them in the warm honey while they’re still slightly warm so the honey coats every piece.
Tip text

Dessert
Italian
authentic Italian struffoli,


Rustic Italian ricotta almond cake

Rustic Italian Ricotta Almond Cake

This post may contain affiliate links, that help support this blog. If you make a purchase through these links, I may earn a commission—at no cost to you. For more information read my disclosure policy.

There is something special about Italian desserts- simple, elegant and always full of flavor. Among these treasures is one of my favorites rustic Italian ricotta almond cake. A treat that brings together the delicate nuttiness of almonds and the rich creaminess of ricotta. This cake is a  piece of Italian tradition, often shared during celebrations or afternoon coffee. It’s light with a moist texture with subtle sweetness.

The beaty of this cake is it’s simplicity and rustic charm. It doesn’t rely on heavy frostings or fancy decorations- just high- quality ingredients and a recipe passed down through generations. Whether you’re recreating memories of family gatherings or exploring Italian culinary, rustic Italian Ricotta almond cake is one to try.

Three Tips for success when making Rustic Italian ricotta almond cake

  • Use high quality ingredients: opt for full fat ricotta for creaminess and moisture.
  • Chop the almonds fine for a smooth texture, and ensure your eggs are at room temperature to mix evenly.
  • Incorporate air into the batter: Beat the eggs and sugar thoroughly to create a light and airy mixture. This step ensures the cake has a delicate crumb.

Don’t overbake: Bake the cake just until the edges are golden and the center is set but slightly soft. Overbaking can make the cake dry and dense. Use a toothpick test to check- it should come out with a few moist crumbs, not wet batter. This  rustic Italian ricotta almond cake is a delicious blend of easy and elegance , perfect for any occasion.

Ricotta gives this cake its soft, moist texture while almond flour adds a subtle nutty flavor. For the best texture, use whole-milk ricotta and drain off any excess liquid before adding it to the batter.

Storage

Store covered at room temperature for up to 2 days, or refrigerate for up to 5 days. Bring refrigerated cake to room temperature before serving for the best texture.

Freezing

Wrap individual slices tightly and freeze for up to 3 months. Thaw overnight in the refrigerator or at room temperature.

What to Serve With It

  • Fresh berries
  • Powdered sugar
  • Whipped cream
  • Freshly sliced fruit
  • Espresso or Italian coffee


More Italian-inspired desserts to try:

Italian Rainbow Christmas Cookies  Colorful almond-layered cookies with rich chocolate and a classic Italian bakery flavor.

Cranberry Orange Ricotta Cookies— Soft, tender ricotta cookies with bright orange and tart cranberries.

Lemon Blueberry Semifreddo A creamy frozen Italian dessert bursting with fresh lemon and blueberries.

Struffoli Little balls of fried dough tossed in honey and topped with festive sprinkles.

Italian Panna CottaLittle balls of fried dough tossed in honey and topped with festive sprinkles. 

Rustic Italian Ricotta Almond Cake

This rustic Italian ricotta almond cake is soft, moist, and lightly sweet with a delicate almond flavor. Made with creamy ricotta and almond flour, it’s an easy Italian-inspired dessert that’s perfect with coffee, tea, or for a simple after-dinner treat.

  • 3 eggs
  • 1 1/2 cups of sugar
  • 1 stick room temperature butter
  • 2 tsp. almond extract
  • 2 cups ricotta cheese
  • 2 cups of flour
  • 1 Tbsp. baking powder
  • 1 cup almonds finely chopped
  • powder sugar and 1/2 cup sliced almonds
  1. Preheat your oven to 375-degrees

  2. In a bowl beat the eggs and sugar until light and fluffy
  3. Then add in the butter, ricotta and the almond extract and beat until well combined
  4. Mix the baking powder with the flour
  5. Add the flour to the egg mixture and mix until well combined. Fold in the chopped almonds.
  6. pour the batter into a greased 8 inch spring form pan.
  7. Bake in the a preheated 375-degree oven for 40-45 minutes or until a toothpick comes out clean.

  8. Let cool slightly before removing from the pan.
  9. Top with powder sugar and the sliced almonds.

Don’t overmix the batter once the flour is added. Mix just until everything is combined to keep the cake tender and moist.

cake, Dessert
Italian
ricotta almond cake